Monday, May 16, 2016

My Ongoing Saga of Autodesk Desktop Application

This poor half blind, lame in one-leg, incontinent piece of software continues to amuse and aggravate me. Twice in the last two weeks it has let me know I'm missing some updates.

Amusingly and aggravatingly ... they've all been installed already.

So I indulge it and try to install them again thinking that will help it see better. Nope ... sure enough ...the application that needs the update figures out it is installed already.


Typical response for all four items...

Saturday, May 14, 2016

Wish - Revit Safe Mode

I'm echoing something I heard David Baldacchino suggest, good idea Dave. Revit will crash from time to time. Sometime it isn't because of something I've done, it tracks back to an add-in I've got installed. It can be a bit of a hassle to disable add-ins to rule them out.

It would be handy if there were a way to start-up Revit in safe mode - add-in free so to speak so it can run on its own and help us diagnose an issue.

Speaking of Wishes - Autodesk started a new community forum called Revit Ideas to post this kind of thing. It allows us to Vote Up an idea so those that many of us really like can rise to the top. Potentially this can help them focus on things we really want and are (hopefully) expressed well enough to pursue.

Friday, May 13, 2016

Keyboard Shortcuts

These are the fastest way to start a command or tool in Revit. No amount of user interface customization we can do or Autodesk can give us will beat them. My problem with them is my ability to remember them. Yesterday in a discussion with some other people I did a quick count and came up with 24 that I could remember without any real effort. Today I managed 31 so I'm seven smarter today! Oh, up to 33 if you count the ones I remember have alternates.

How many do you remember??

The Keyboard Shortcuts I remember today (the winners) are...(bold are ones I use constantly, which helps)

Viewing
ZZ(ZR) (Zoom Region)
ZA (Zoom All to Fit - all open views)
ZF (Zoom to Fit - active view)
ZS (Zoom Sheet Size)
ZO (Zoom out 2x)
WT (Window Tile)
XX (Close Hidden Windows - custom)

Snapping
SM (midpoint)
SE (endpoint)
SI (intersection)
SO (snaps off)

Visibilty
VG (VV) (Visibility/Graphics)
VR (2017 View Range)
HH (Temp/Hide Hide Element)
HI (Temp/Hide Isolate Element)
HR (Temp/Hide Reset)
IC (Temp/Hide Isolate Category)

Editing
CO (Copy)
TR (Trim - Corner)
TS (Trim - Single Element - custom)
SL (Split Element, with Delete Inner Segment option checked a lot)

Creating Stuff
WA (Wall)
DR (Door)
CM (Place Component)

Annotation
DI (Dimension Aligned)
TG (Tag by Category)

Miscellaneous
MD (Modify)
RL (Reload Latest - worksets)
CTRL+C (copy to clipboard)
CTRL+V (paste)
CTRL+X (cut to clipboard)

Thursday, May 12, 2016

Revit Oped Podcast - Test One Two

Bill Debevc just celebrated his first anniversary of BIM Thoughts. We talked about doing a separate podcast together tied to what I do with this blog in some way. He made sure we actually started it by sending me a meeting invitation. He's doing the heavy lifting of preparing it for me. I get to show up, chat with him for a bit and wander off again.


Last night it was finally listed at iTunes, you can search for it there now using Apple's Podcast app or your other favorite Podcast software.


We've set up a blog site to store episode notes and allow for comments. It's still under development so don't be surprised if it changes over the next month or so. Our first episode is called Hello World!. It is possible to just listen to each episode on the blog site too.

Bill came up with our nice podcast logo.


I asked my daughter to create one and liked her initial design sketch a lot but she's got so much school work I took it off her plate. My son Jake did the intro/outro music for us, thanks!

Bill, thanks for making me do it! We hope people listen and enjoy it.

Wednesday, May 11, 2016

Conferences and Memory Lane - Revit View Reference

Reading tweets about RTC in Australia getting ready to open its doors I also read a thread about View Reference families. I wrote about a quirky move grip location issue four years ago to describe how they were misbehaving for me. Which reminded me about how I like to use them for a slide deck inside Revit.

I thought I'd echo that post here again in the spirit of the 2016 RTC season opening. To those attending RTCAUS, have a great conference in Hunter Valley. I hope to see you (some/many) at RTC this July in Scottsdale, AZ. Here's the post:

- - - - - - - - - - - - - - - - - - - - - - - - - - - - - - - - - - - - - - - - - - - - - - - - - - - - - - - - - - - - - - - - - - - - - -

Years ago I wrote about using Revit to help me coach my son's soccer team. Since I seem to have an unhealthy focus on using Revit for things that might not make any sense it should be no surprise that I'd find a way to avoid using Power Point. When Revit 2013 came out it expanded on what we could do with the View Reference tool (wrote about that before too).

Well since then, at the last few conferences I've been a presenter for, I've been using the view reference as a way to move forward or back through a "slide deck", a Revity slide projector. I did use Power Point to create the slides since that's what the templates were using already. I used a screen capture of each slide as an image inserted into drafting views.

Here's what my intro slide looks like for my session later today (four years ago) at Autodesk University 2012, it's called "Sharing Work with Worksharing Using Autodesk Revit".


See the little arrows on either side of the image? Those are my back and forward buttons, they are just referencing the previous and next drafting views (slides). Instead of showing the sheet reference information that it would normally show I just added the back and forward facing arrow graphics.

It's just the sort of Power Point that this Revit guy likes!

Tuesday, May 10, 2016

Revit Viewer and Worksharing

Reading a thread at Autodesk's Revit Community forum David reminded me of the quirky issues related to the Viewer when worksharing is being used. If someone launches Revit Viewer and then tries to open a project that has enabled worksets they'll get this warning.


When the file is opened and they try to print, export or save they'll get this warning even though they haven't DONE anything...but Revit has made changes to the file in order to create a new local file.


Okay, let's follow the instructions in the first warning message. We'll open the project using Detach from Central. Sorry, "Do not pass Go, do not collect $200". That process also changes the file. Still no export, save or print for you!

The ONLY way we can use Revit Viewer to open a project with Worksets enabled is to open the Central File itself, by un-checking the option to Create New Local. This means that user is now working on the real central file with Revit Viewer.

If you do this you will likely encounter several of the messages shown in the first image. The projects I've done this with all have linked files and it seems to pop up for each link (RVT) used and once more if there are any linked/imported DWG files.

To the good, they won't be able to synchronize their work nor will it prompt them to Save when they close the file. They won't be able to edit much of anything though because they can't borrow elements. The notion of using Revit Viewer to poke around the model, do some experimental stuff within the model is off limits to Viewer mode. We are able to print or publish to DWF, because those formats don't create an editable version of the data/model.

It seems to me that the notion of Revit Viewer for workset projects is fundamentally flawed, if we're thinking of it as a way for Project Managers to poke around, do anything other than JUST LOOK at views. If we'd like them to be able to cut a section view or hide things, do anything that requires temporarily borrowing something, that's all off limits to the Viewer.

For that we'll have to show them how to use Detach from Central AND to be careful not to save that file overwriting the original project.

Monday, May 09, 2016

Open Sheet - Equal Rights for Panel Schedules

This new right-click choice exists, within the Project Browser, for views that are on sheets. Views that are real that is. Schedules are special views, they can be placed on more than one sheet (like Legends). Electrical Panel Schedules share this distinction but unlike other schedules they are not nearly as likely to require being placed on more than one sheet. Their schedule-ness makes this right click option invalid for them too.


I realize it probably isn't easy or perhaps even possible to segregate this schedule-ness from Panel Schedules but I would have found it very handy to be able to use the Open Sheet concept for them several times today. In this instance it would have been faster than navigating through a very long list of sheets. I suppose it is also possible that some firms do need to be able to put Panel Schedules on more than one sheet, in which case...bummer for me and my wish...

Friday, May 06, 2016

Create a Local File - How Often

Every time...

I no longer reuse Local Files. My attitude and habits have changed a little over the years. I wrote this POST in 2008 and then THIS on in 2011. I've touched on the subject many times within the context of other workset related posts.

I treat my Local File as ephemeral...temporary... I make use of the Open File option Create New Local each and every time I start working on a project again; yes even if I just stopped working earlier to have lunch or join a conference call.

Thursday, May 05, 2016

Getting Started with Collaboration for Revit (C4R)

Below are a couple of links that describe the process for getting your project started using Collaboration for Revit (C4R).

It all begins with creating a project using your A360 account/subscription. Naturally you've got to create an account first so this assumes you've done that. The linked page also explains how to upload your current project to the A360 project if necessary.

If you're responsible for putting your active file on the A360 Project, READ ME, it has a video too.

There is a ton of information lurking at Autodesk, just use your Google-fu.


Wednesday, May 04, 2016

Revit Viewer

Yes it still exists.

I've been doing some work with Autodesk as a Revit Mentor helping users navigate their 30 day trial. One of the recurring themes is, "I only need Revit to view other peoples models. How do I do that?" In the old days a version of Revit that lacked a license turned into viewer mode. At times that proved a bit dangerous because a user could lose a license (network issues or internet access) while working on a model and find themselves in Viewer Mode and unable to save work they ordinarily could, should be able to.

To counter that situation we now have a separate application that is Revit Viewer. It's installed alongside Revit, wherever you decided to store it on your computer. In my case it's listed like this when I search in Windows 10. FWIW, I don't put any icons on my PC's desktop so that's how I start everything, click on the Window...type a few letters, launch an app. It's the illusion of an uncluttered mind! My actual desk...well that's a different matter...


When you run it you'll be greeted by this message before it will finish opening and let you open a project.


It is worth stressing that the limitations the dialog above describes kick in as soon as ANY change is made. I frequently hear, "I can't print in Viewer mode". That happens when you change the model, to which they reply, "I want to print using a different titleblock, I switched to a different one".

Yeah, that's a change...

It doesn't matter how minor or subtle a change is, the key word is change. If you move a tag, add a dimension, put a view on sheet, change a view's scale, a view's detail level...yeah those are all changes. Trying to print (or save/export) afterward will cause Revit to pop up the dialog above again. If you get the dialog, use Undo until the action you want will work. Most likely you'll have to undo everything you've done just after opening the file.

I should clarify, using Viewer won't allow exporting to formats that can be modified (that is part of the license warning message). That means Viewer can't be used to export to DWG, DXF, IFC etc. We can use Viewer to Print or Publish to DWF.

Tuesday, May 03, 2016

Autodesk Installation and Updates Exercise Survey

Autodesk staff are reviewing the terms that are used for software installation and applying updates. They are looking for our help by performing a set of exercises that should take less than 15 minutes to complete. Your responses will help them organize and more clearly describe things that are delivered as part of the installation or update process.

Would you like to help? START HERE

Revit 2017 - Text and Character Map Use

I mentioned the other day that a user had shared with me some difficulty using symbols from Character Map (charmap). Autodesk has written a Knowledge Base article about. Hopefully the first service pack (Update Release...whatever they call it this time around) will fix it.

Read the article at Autodesk.

If you'd like to watch an Autodesk Screencast video and the thread at the Autodesk Community Revit forums CLICK ME.

Fwiw, in my testing I'm not having any difficulty with inserting symbols via the ALT codes or copy/paste. There must be a bit more subtlety to the issue.

Monday, May 02, 2016

Autodesk Insight 360 Survey

I have no idea how many readers of this blog are active users of this product. Just in case...

The Autodesk Insight 360 team has put together an industry marketing survey. The survey itself is HERE and THEIR BLOG POST provides more information.

What's in it for you? Take the survey, enter your email address and you’ll be entered to win one of ten (10) $50 Amazon gift cards. The survey closes on the 31st of May.

If this product is part of how you do your work take the survey now so you don't forget. If it isn't then consider taking the survey anyway; offer up your insight regarding why you don't use it now (see what I did there?).

Revit 2017 - Filters and Reference Planes

Filters have been expanded to see Reference Planes.


You're probably aware that Reference Planes don't have many parameters, just these three instance parameters: Scope Box, Name and Subcategory. They don't have any Type Parameters because they aren't defined by types like grids or levels for example. If we examine the Filters dialog and see how those three parameters play out as criteria we'll find they don't.


The More Parameters... or Browse button to its right are tempting but we still can't create parameters associated with Reference Planes.


This makes it rather difficult to actually use a Filter for Reference Planes, criteria based filters anyway. We can select them (Reference Planes) first and create a Filter based on selection but that's not really much different than using Visibility/Graphics to turn them off or override their appearance.

While it makes for an enticing item in the list of what's new it will only serve to frustrate you if you pursue it. It's a shame that we aren't offered at least the Name parameter to use in a filter. It looks like the critical path for this feature wandered into the weeds and got stuck in some quicksand.

I'm sure we'll take good advantage of being able to differentiate them from one another and control their visibility using Visibilty/Graphics and View Templates despite this situation.

Sunday, May 01, 2016

Revit 2017 - Calculated Values in Tags

This addition permits us to do the same thing to tags that we've been using in schedules. For example, in a tag I'd like to show the difference between the client required area and the actual area of a room. That wasn't possible without some export/import or Dynamo shenanigans. Now it is possible, right in a tag.


This starts in the Edit Label dialog via a new button, then it is the same as the dialog we've seen in Schedules.


Since these can be used in schedules and tags, and it has to be done separately for each use, it probably makes sense to document all of the formulas we use so they are easily harvested for another project. Build them into a template and there is less need to do that at all. Regardless it wouldn't hurt to have a Drafting View set aside with the text versions of all the formulas we use stored there. That way a simple Copy/Paste operation can harvest a formula to use in a tag or a schedule or both.

Saturday, April 30, 2016

Revit 2017 - Align Padlock and Wall Core Centerline

If you think you're going crazy because no padlock appears when you try to align and lock a Wall by its Core Centerline, you're not crazy (not about that anyway). Revit 2017 seems to have gotten distracted and doesn't turn on the padlock when using Align on that portion of a Wall. Damn that's subtle!! They are on it though. I imagine it'll be fixed once an Update Release (Service Pack) is made available.

Friday, April 29, 2016

Controlling a Solid Form with a Visible Parameter

Here's a video trip back to a basic family editing concept. It describes two solids, a cube and sphere. I assign parameters to their Visible parameter and then show how we can use a formula to toggle one of them on/off and using Family Types to manage them. This works fine for solids, voids are another matter...and the subject of a later video.


Thursday, April 28, 2016

Revit 2017 - Associate Family Parameter Tool Tip

It's the little stuff...

Revit 2017 is missing the tool tip for the Associate Family Parameter button that it took awhile to get. Now it's tool tip-less again.


It makes me sad for that little sneaky button :(

Wednesday, April 27, 2016

Multi-Segment Grid and Crop Boundary Interaction

When one segment of a multi-segment grid passes entirely beyond a views crop boundary that segment is not displayed. That seems reasonable to me. The annotation at the end of the grid however also disappears and that doesn't seem as reasonable to me. I'd like that to remain especially since (when) that end isn't coming into contact with the crop boundary. It is easier to see with a video capture embedded below. Whaddyathink?


Tuesday, April 26, 2016

Revit 2017 - Text Element Error Message

I created a drafting view and placed a single text element. I type a simple sentence and then clicked the new Close button on the ribbon. I received this nonsensical warning for my effort.


Doesn't seem to matter what view I am placing text in, clicking the Close button pops up the warning. I'm curious if others are seeing this too? I was using the stock architectural template from the Imperial Library. Simple fix is to just finish text in the same old way, don't use the Close button.

Edit: A little more testing and the plan view Level 1 doesn't seem to mind anymore. When I tried it again in the Construction template the floor plan view Level 1 didn't complain but Level 2's did and the Ceiling plan for Level 1 did too. Okay...more weirdness. This is after placing text in an Elevation view.


Traded emails with Aaron Maller last evening and pinned down the circumstances that this issue is reproduceable. It boils down to placing text in a view and then placing text in another view while the previous view is still open. Revit doesn't seem to recognize that the new text is in a different view when the Close button is used. Here's a video explanation.


Monday, April 25, 2016

Revit 2017 - View Range Keyboard Shortcut

Brian Mackey wrote a post earlier today that describes two quirky issues with using the new View Range keyboard shortcut VR. It is definitely subtle, quirky and worthy of an echo.

The first quirk is having to click Apply first and then OK to close in order to make a change stick. I'd run into that too and meant to write something but Brian was quicker to the keyboard. The other, and very important, thing to know is that using it ignores when a View Template has been assigned to a view, meaning the template is supposed to be controlling the parameters for View Range. That's not good! Check out his thoughts.

As such it is no longer his favorite new subtle feature and I'm inclined to agree, too bad.

Sunday, April 24, 2016

Revit MEP - Wire Size AWG vs MM

I wrote a post about this subject before. There is an app at the Autodesk Exchange Apps that offers trap door access to revise the bias toward AWG size versus.

It is called Convert Wire Size (AWG to MM) and it sells for $4.00 USD. I haven't used it myself but for those firms that need wire size reported in millimeters squared it may be the solution you need/want until Revit itself allows us to switch the criteria directly itself.

I'll be curious to hear how well it satisfies what engineers are asking for.

Saturday, April 23, 2016

Family Templates and Reference Plane Inequity

This is subtle but still a source of amusement or annoyance. Start a new family using the Generic Model template and try to copy an existing Reference Plane. Nope, the Copy tool is disabled.


Now try it with the Furniture template. Ah, Copy is enabled.


Try it in the Casework family template. You'll find Right, Left and Front Reference Planes are forbidden while the Center (Left/Right) and Back Reference Planes are not. That makes sense. Wait, what?

Okay, the rule is copying a Reference Plane working on furniture is okay and doing that in Generic Model templates = BAD? Doing it in the Casework template is, well it depends...

Actually the only rule is that you can expect some reference planes in some templates to be forbidden to copy while others are not affected by such thinking. Ralph Waldo Emerson cautioned us to avoid a foolish consistency. In this case a little more consistency wouldn't be bad.

...I'm not asking for all of them to be forbidden either...if you're wondering.

Friday, April 22, 2016

Revit 2017 - Upgrading Text Warning

In my earlier review of the text editor I included this warning:
When you upgrade from older projects you're going to have to deal with text changing to reconcile these changes. That means you CAN'T upgrade a project a couple days before a major deadline and expect to just hit print.
I should have also said that means anything that has text in it, like tags, title blocks and so on...

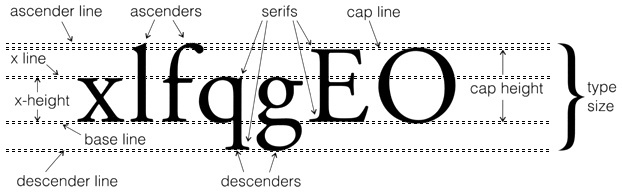
My post mentions that text height is defined differently, more like AutoCAD. The help documentation offers a graphic and an explanation of what has changed. I also marked up this image from Dynamic Statements to indicate how the text height is defined now. The overall height is based upon the capital letter M, measured from Base Line to Cap Height (for M). That's apparently more like how AutoCAD does it.


Brian Mackey (The Revit Geek's Blog) has written two posts about what he's observed happen with an upgrade so far. This is the FIRST and this is the SECOND post. Damien Ferlazzo (Revit Link blog) shares his experience upgrading text so far with his POST. Check out their posts.

I've also read a couple of threads in forums from users sharing what has happened with their TEST RUNS at upgrading. I emphasize that TEST RUNS because at this point that is exactly what we should be doing.
Please, please, pretty please with sugar on top...don't upgrade and expect to just carry on without reviewing everything very carefully. You (we all) have some text fixing to do!
P.S. As I was finishing this post I just heard from someone that they are having some issues trying to use the ALT codes for special characters via Character Map. I also heard that some text types were not editable at first but closing the view and opening it again helped for some reason. I'm sure there will be more to come as more people start using it seriously.

Thursday, April 21, 2016

Revit 2017 - Enabling Worksharing

The process for enabling worksets has changed with this release because Collaboration for Revit (C4R) has been incorporated into Revit directly. This allows someone to subscribe and begin using it quicker. They might even be able to do so without any (or much) EyeTee intervention.

The first evidence that there is something different is on the Collaborate ribbon tab; there is a Collaborate button next to the disabled Worksets button. There is a new Communicate panel too.


In the past enabling worksets began with clicking on the Worksets button but now we start by clicking on Collaborate. This takes us to the fork in the road necessary to permit sharing the project via A360/C4R whether we are able to use it or not, just in case. If the file hasn't been saved before clicking Collaborate we get a message asking us to do that.


Then the Collaborate dialog appears asking us to specify which method of sharing the project we need; Collaborate within your network or Collaborate using A360.


When we choose Collaborate within your network Revit enables and creates two User-Created Worksets called Shared Levels and Grids and Workset1 (like in the past) but it doesn't open the Worksets dialog (like it used to). This allows us just to get on with our work using the Active Workset (Workset1 by default). If we need to create additional worksets then we'll find the Workset button is enabled, just click it to open it (Workset dialog, as in the past.

The Communicator button is tied to using C4R. It is a separate window (dialog) that can display information about your project team activity, if you're sharing the project using A360. Imagine concepts from Worksharing Monitor combined with Instant Messaging features and that's what you've got. FWIW, it used to be able to dock inside the Revit UI but it doesn't do that now. If you've got two or more monitors you'll probably prefer it on one of them instead anyway. This is what it looks like if I'm not logged into A360 and not using it to share this project.


At some point we'll need to Save the file and like in the past we'll be warned that this is the first time we've done that since we enabled worksets; click Yes.


Remember, if you'd like to set the default Open option to Specify remember to use Save As instead of Save. You only get a chance to do that with Save As. This allows us to choose which Worksets Revit should load before it opens the project entirely. This can have a significant impact on how long it takes to load a project.


At this point we are still working in the Central File, which isn't practical to share the project nor is it advisable. I can determine that by looking at the Save icon on the Quick Access Toolbar (QAT), it is disabled and the Synchronize and Modify Settings button next to it is enabled. The project's file name listed on the Title Bar doesn't include my user name either. By the way, we need to SwC to relinquish our ownership of the User-Created worksets properly. The only way to do that is to use SwC (Synchronize and Modify Settings), via the dialog that appears. The Synchronize Now button does NOT do that.


Now that worksets are enabled and relinquished we need to close the project so the team can get started by creating their Local Files. When I browse to the Central File to start work I need to make sure that Create New Local is enabled and double check the Open option is assigned to Specify.


Remember doing so will cause this dialog to appear before Revit begins opening the project further.


Okay, now get to work; in your Local File!

Wednesday, April 20, 2016

What is New for Navisworks 2017

The answer is not a lot. Here's a list of the new features they've taken time to document. The list is so underwhelming I've just taken it off their site verbatim to underscore it's half-hearted attempt. Note the UI description - "we made some changes". I saw a tweet about reading through the list in two seconds and I thought they were kidding; they weren't.

European Region Support
Navisworks 2017 provides access to BIM 360 Glue projects hosted both in the United States and Europe. Just select your regional server after sign-in.

BIM 360 Shared Views
Navisworks 2017 continues to support synchronized Shared Views with BIM 360 Glue, providing real-time access across BIM 360 Glue connected clients . Shared Views assist review and analysis activity in your BIM360 Glue project team, for closer collaboration.

Shared Views created in any BIM 360 Glue connected client retain view fidelity, including:
  • Object Visibilty (hidden state)
  • Object Overrides - color and transparency (transparencies are fixed at 95%)
  • Section Planes and Boxes
Shared Views can be renamed, moved into folders created in BIM 360 Glue and saved directly in Navisworks.

UI Improvements
We've made some changes to the Navisworks BIM 360 and Home tabs, making access easier and offering a more intuitive user experience.

CLIC Licensing
The introduction of CLIC brings cohesive access via single license, that supports both desktop and cloud services.

Faster Model Display (faster is always better, my words)
Improved speed of synchronizing data and display of model list, and faster streaming of BIM 360 models.

Autodesk 2017 Product Integration
Providing support for the latest Autodesk applications is fundamental to Navisworks, ensuring that the latest version of design models and data can be reviewed and analyzed. Updated file readers, exporters and integrations include:
  1. AutoCAD 2017 file reader and exporter
  2. Civil 3D 2017 file reader and exporter
  3. Revit 2017 file reader and exporter
  4. Inventor 2017 file reader
  5. 3DS Max 2017 file exporter
  6. Recap 2017 integration
  7. Vault 2017 integration
  8. Intergraph CADWorx Plant file reader updated to include support for additional properties including User data and Insulation.
I can't help but reading through that imagining, "Awe...we were so tired from the last two releases, cut us some slack dude...". Maybe they are working on some killer stuff that couldn't be wrapped up in the yearly release cycle? Optimistically, at least getting up to speed with Navisworks 2017 this year won't take long.

Tuesday, April 19, 2016

Revit 2017 - Space Naming Utility Update - It is Available Now

The other day I poked Autodesk about this feature. As it turns out it is deployed slightly more automatically. The catch is that the latest iteration of Autodesk Desktop Application (I'm going to call it AdA) must be used to see these updates.

My first problem was that AdA wasn't working. It just displayed a blank white screen. I also noticed that there was no Autodesk (A icon) in the system tray for an active service. Eventually I used the wisdom of The IT Crowd; turned it off and on again. That restarted the service and AdA started working, displaying information.

The second problem was there were no updates to choose from. I logged out of A360 and closed its system tray instance. I also logged out of A360 via Revit, since I had it open. I closed the instance of AdA in the system tray too. I had a browser open looking at my Manage portal. I thought that maybe my access settings were wrong. I logged out and closed the browser too. Then I logged back into A360 and launched AdA...voila, updates appeared. It made no difference earlier that I used the right-click Check for New Updates option for AdA in the system tray repeatedly.

Once I got it working again this appeared in AdA.


This a tiny bit better.

People will still have to pay attention to be alerted to download and install it. If they don't have enough control over their computer they'll still have to get EyeTee involved. I'll have to see if I notice more people have it installed in the coming months.

Once it has been downloaded and installed you don't have to rely on AdA to pass it along to others in the office though. You can just capture the downloaded installation file from the location defined when you downloaded and installed it the first time (C:\Autodesk by default).

It is also a bit tedious that every one of the updates is a separate installation; must be run and completed before starting another. If you attempt to run them while another is running you'll run into messages about something already being in process.

By the way, when you run Revit after installing all the available updates you may be greeted by "Security - Unsigned Add-in" warnings. Nice...


I've got my Space Naming Utility! Do you? I hope so!

...and thanks to Paul Aubin for the heads up!

Monday, April 18, 2016

Revit 2017 - Combine Parameters in a Schedule

This is the often requested ability to concatenate parameters values into a single column. The schedule Properties dialog has seen some cosmetic changes, note the new Combine Parameters button.


We see the new smaller buttons replacing the larger and clearer buttons of old. I also get the New and Modify buttons confused with each other ALL the time. When we use Combine Parameters the dialog looks like this for a Room Schedule.


This is combining width and height into a single size parameter for a Door Schedule.


Another very interesting possibility is to combine different parameters for the same values when different families are displaying the same information but have different parameter names, because they came from different family creators. Here's combining three versions of width parameters into a single column, three families using three different shared parameters for the same thing, you can see I left each parameter's name in the heading.


I found it interesting that I can even combine parameters assigned to different Types of Parameter, like length and text. This is an example where I've combined two text parameters and one length parameter all intending to say the same thing, however impractical it will be to deal with the units of that mixture, or lack thereof.


This means we can create a VAV Schedule based on different families from different manufacturers and combine their different manner of Horsepower (or similar) parameter value into a single column. VERY interesting!

Sunday, April 17, 2016

Orientation is not Managed by View Template

When we choose to assign a View Template (VT) to a View, that makes the template the view's boss. It takes over control of each setting we choose to make it enforce. In this image notice the parameters that are gray, not editable?


Those are being managed by the View Template. I've got to edit the VT to change one of those parameters or use Enable Temporary View Properties to override them briefly.

I noticed yesterday that the Orientation parameter does not behave like other View Properties even when a VT thinks it is in charge of it. This is the VT's dialog showing it is currently assigned to Project North; we can choose either Project North or True North. The check in the Include column (on the right side) indicates we want the VT to take over.


Therefore I find it counter intuitive that we can still interact with and change the Orientation parameter in the Properties Palette even though the VT is in charge.


If the VT is changed the view will follow along as expected. I wouldn't expect to be able to change it back in the View's properties with the VT in charge, but I can. This means the Orientation parameter is affected (managed half-heartedly) by a VT but it isn't truly in charge of the parameter, not like it is for other parameters.

It is inconsistent, perhaps a bug?

Saturday, April 16, 2016

Revit 2017 - Reference Plane Subcategories

As I shared in the What's New post the other day, we can create our own Reference Plane subcategories; in both projects AND Families.

It is my opinion that Families should NOT bring Object Style subcategories for Reference Planes into Projects when they are loaded.

I realize that this is carry on baggage because Object Styles are loaded from a family into a project, that's how it works. However, it would be much better if something we can't even see or actually use in the context of the project doesn't get added to its database.

If people really like this enhancement and start using in all of their content then it could get really messy. The only people that won't incur the wrath of this are those that manage their content library aggressively. I really hope we don't end up with this...


I sure hope this is something the folks at the Building Content Summit will consider discussing to get out in front of it some.

Friday, April 15, 2016

Revit 2017 - Text Editor Features

Long awaited, much rejoicing was heard when Revit users heard the news, there is a new text editor. Really? Can it be true? Yes they've revisited the text feature in Revit! Will you be pleased or at least happier? They certainly hope so.

Initially things don't look different. You still click the Text button and find text defined by Types. Text Types have the same Type Parameters we've had before. Prior to clicking to place text the ribbon is still the same too. You click to place text in the same way. Once you've done that you'll begin to notice some differences, namely in the context ribbon panel.


To begin with you'll notice, on the right end of the ribbon, that there is a Close X button, a formal front door to finish editing text now. The only way to finish editing before now was to click in empty space, outside of the text element somewhere.

On the paragraph panel you find the same list of choices for indenting, bullets, and outline formatting with numbers or letters. There are two new buttons to increment the indented list. This permits us to increase the starting value of a list. Similar but a little different from a word processor like MS Word.


The previous image has different text elements for each indented (numbered) list. We can insert a space in a series of notes and have the numbering continue within a single text element too. It is a bit quirky however. I find it only works if you create the numbered or bulleted lines first and then go back and use CTRL + Shift to insert the blank line between the list sections. Here's another example using this technique instead.


You'll probably suspect or notice that I used a separate text element for the header of the notes. That's still necessary because the text types don't support overriding font height, as before. Indented lists that use one of the four bullet or numbering options cycle through each of the four choices when you Indent a line, like this.


I can guarantee that someone has a numbering syntax they want that the text editor doesn't support; if yours doesn't match the above I'm correct. FWIW, this IS the first outing of the brand new engine in the car so we'll have to take them at their word that they'll continue to improve on it with future updates and releases.

Also new are buttons for Superscript, Subscript and All Caps. As you can see in the next image All Caps is currently active which is causing everything I type to use uppercase. It is worth noting that all the text will be displayed during editing, a result of their abandoning the special text editing canvas we had before (fixes zooming too, more on that later).


The new editor supports Fonts that can range from 1 - 1638 points and the maximum and minimum height of text is determined by the font. As I understand it, this means for Arial this translates to an approximate range of 0.1” to 16.3” or 0.3 mm to 413.6 mm. A text note also has a maximum width of 84” or 2135 mm.

Empty Text Notes are allowed if there is a leader. If the leader is removed the Text Note will be removed (if it does not contain text). Those people wanting to just place a leader have just experienced a spike in their heart rate.


This means we can place just a leader next to a View Reference family that, as a tag family of sorts, remains leader-less, sad view reference family...sad face.


When editing the user has the option to always have the border displayed and the option to always have the note display with an opaque background. That is determined by accessing the Edit Text options via a sneaky arrow button under the Close (text) button.


They've managed to fix the zooming issue we've had with editing text. When we are editing text zooming in and out of the view doesn't influence the text element negatively now. As I mentioned briefly earlier, you'll notice that we don't enter into a special text editing canvas anymore. The rendering engine that generates what we see on screen has been reworked to permit this to behave better. That's a welcome change.

I still think it's wise to use the Zoom Sheet Size feature to get a better sense of proportion while editing the text. With what is possible with screen resolution these days though it's not uncommon to find it quite hard to edit text without zooming closer to it. The same could be said of the schedule editing view too, which remains unaffected by these changes however.

Did you know that fonts are complicated? The more you know about something the more complicated it is, like life I suppose.

Part of the process of building the new text editor involved comparing how Revit worked with AutoCAD. As a result, they've revised the method for measuring text size to be a bit more like it (AutoCAD). In the past the size of text was measured from the font baseline to its ascender line (that's technical font speak). Unfortunately typical characters do not extend to the ascender line. This means when we attempt to measure the resulting font we usually don't get a result we'd expect. As of 2017 the size of text will be based on using the font's cap height, which is measured from the baseline to the top of the capital letter "M". That decision was based on customer feedback and further review of AutoCAD's own code.

There are still going to be some differences if we observe font generation in both programs very closely, in particular when it is exported to DWG. A developer explained it like this. In Revit when you want a certain text size in length units it has to pick a size that matches as close as it can in point size, for example 12 pt Arial. Revit selects a size in 1/2 point increments. This rounding affects measuring where a paragraph will wrap to the next line. This means the text size or the text note width cannot be exactly reported if exported. No font is identical to another, the spacing between characters is different so it isn't possible to accurately scale it based on the width of the note either.

Are you familiar with these settings governing exporting Text to DWG format?


These influence how Revit decides what is most important to you during the export. Preserve visual fidelity is most appropriate when we want the text to LOOK as close to the same in Revit and AutoCAD as possible. Use Preserve Editability when you're more interested in matching the size of the font as close as possible; which may result in different looking bodies of text in AutoCAD. Put another way, if you want the paragraph to look the same, wrapping and number of rows of text then choose the first. If you're more interested in being able to select the text in AutoCAD and see the same text height (again as close as Revit can do it) value then choose the second.

Yeah...complicated...

Known Issue - Open Type Fonts (OTF) not supported yet, due to issues exporting to DWG

Finally, when you upgrade from older projects you're going to have to deal with text changing to reconcile these changes. That means you CAN'T upgrade a project a couple days before a major deadline and expect to just hit print. Then again, when has that ever been a reasonable expectation or assumption? Lucky that for the most part it has been practically true. In this case they've completely re-written the underlying text editor code so it's not likely to be as uneventful as some upgrading has been in the past.