Showing posts with label Solids. Show all posts
Showing posts with label Solids. Show all posts
Friday, April 29, 2016
Controlling a Solid Form with a Visible Parameter
Here's a video trip back to a basic family editing concept. It describes two solids, a cube and sphere. I assign parameters to their Visible parameter and then show how we can use a formula to toggle one of them on/off and using Family Types to manage them. This works fine for solids, voids are another matter...and the subject of a later video.


Tuesday, March 12, 2013
Blends have Two Sketches
From the been there done that department I bring you a little reminder, Solid and Void blends have two sketches; a base and a top. It's pretty common to see two sketches in the base and the user wonders why they can't move on to the top sketch. When the blend process starts Revit is thinking "base", regardless of the orientation of the blend you are making. How can you tell? Easy, there is a button for Edit Top.

That can only be appropriate if Revit thinks we are working on the base. There isn't even a button for Edit Base until after you click Edit Top.

Once you have two complete sketches, each in their own "world" (Base and Top), you can Click the Green Check mark for Finish Edit Mode. If you need to revisit one or both of the sketches you'll find you can go straight to the Base or Top Sketch via separate buttons, just have to select the form first.

Remember, two sketches, two, two are better than one or twice as nice.

That can only be appropriate if Revit thinks we are working on the base. There isn't even a button for Edit Base until after you click Edit Top.

Once you have two complete sketches, each in their own "world" (Base and Top), you can Click the Green Check mark for Finish Edit Mode. If you need to revisit one or both of the sketches you'll find you can go straight to the Base or Top Sketch via separate buttons, just have to select the form first.

Remember, two sketches, two, two are better than one or twice as nice.
Tuesday, August 23, 2011
Array the Void Instead
Voids and solids interact in a specific order according to when each are created. I wrote another post to describe this in the past (July 2006). When you create an array of solids this can create a problem if your family isn't built with the notion of a maximum number of solids present at design time.
For example imagine slats that provide closure beneath a porch. If you design a family to array the slats you need to decide how many is enough. If you don't and you ask for more slats than your void(s) are able to cut you'll get new slats that aren't altered by the void. As the earlier post explains, this is because voids don't cut (not automatically) solids that get created after they are.
Quite some time ago (May 2005 actually) this came up in the form of a question at AUGI. The inspiration for the thread was Jerry's nicely modelled Queenslander style house and porch detail.

The trick to get this to work is reversing the logic. Since voids can't cut later solids, array the void instead. A new void will cut an existing solid automatically as long as the void and solid intersect when its sketch is finished. This means adding a new void to the array cuts the existing (only) solid, yay!
The "slat" is a single solid "sheet" and the voids array to remove/create the "spaces", to turn the sheet into "slats". There is an arc beneath the slats to carve off the bottom of the slats so they all are cut to create a uniform arc. The arc will flex when the width changes and there is a chord height parameter. It uses a reference line and the first void is created on the flat plane of the reference line. Then the array includes both the void and the reference line.
Here's what it looks like in use.

You can download the proof of concept family at AUGI in the thread or from HERE.
For example imagine slats that provide closure beneath a porch. If you design a family to array the slats you need to decide how many is enough. If you don't and you ask for more slats than your void(s) are able to cut you'll get new slats that aren't altered by the void. As the earlier post explains, this is because voids don't cut (not automatically) solids that get created after they are.
Quite some time ago (May 2005 actually) this came up in the form of a question at AUGI. The inspiration for the thread was Jerry's nicely modelled Queenslander style house and porch detail.

The trick to get this to work is reversing the logic. Since voids can't cut later solids, array the void instead. A new void will cut an existing solid automatically as long as the void and solid intersect when its sketch is finished. This means adding a new void to the array cuts the existing (only) solid, yay!
The "slat" is a single solid "sheet" and the voids array to remove/create the "spaces", to turn the sheet into "slats". There is an arc beneath the slats to carve off the bottom of the slats so they all are cut to create a uniform arc. The arc will flex when the width changes and there is a chord height parameter. It uses a reference line and the first void is created on the flat plane of the reference line. Then the array includes both the void and the reference line.
Here's what it looks like in use.

You can download the proof of concept family at AUGI in the thread or from HERE.
Thursday, July 20, 2006
Which Came First? The Solid or the Void?
...and the other short story...why did the solid cross the road? Sorry I digress.
So you're making a family and you made this solid and then you made this void and Revit cut away the solid just fine. Now you make a new solid and the void acts like it doesn't know it is there even though they intersect. Voids only automatically cut solids that came before, not those that followed. So...when a void doesn't cut a solid because of the order you created them, just use Tools > Cut Geometry and tell Revit to cut em! Worth mentioning, if you create a void and it doesn't intersect with the geometry of the earlier solid(s) when you finish the sketch, when you drag the void so it does intersect with the solid, it won't cut automatically either. Even if the solid was made earlier than the void. So again, Tools > Cut Geometry to the rescue.

 aaah...all better now...
So you're making a family and you made this solid and then you made this void and Revit cut away the solid just fine. Now you make a new solid and the void acts like it doesn't know it is there even though they intersect. Voids only automatically cut solids that came before, not those that followed. So...when a void doesn't cut a solid because of the order you created them, just use Tools > Cut Geometry and tell Revit to cut em!
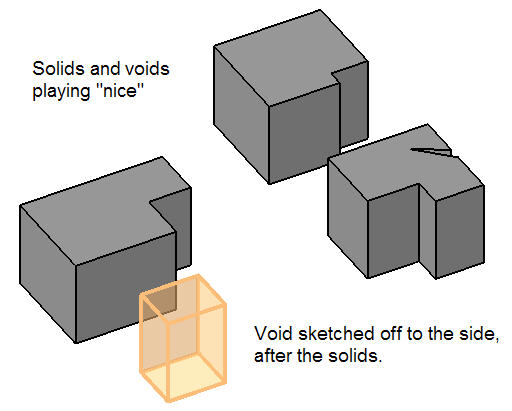 Worth mentioning, if you create a void and it doesn't intersect with the geometry of the earlier solid(s) when you finish the sketch, when you drag the void so it does intersect with the solid, it won't cut automatically either. Even if the solid was made earlier than the void. So again, Tools > Cut Geometry to the rescue.

 aaah...all better now...
Subscribe to:
Posts (Atom)