Showing posts with label Tags. Show all posts

Friday, July 28, 2023

Room Tags and Leaders

For many years I wished room tags would turn on a leader IF I dragged a room tag outside of the room's boundary. I got my wish in Revit 2023.1. I also got more than I wished for which is not that uncommon unfortunately, thus the saying, "Careful what you wish for".

When we are moving rooms around things go awry. If we drag a room to a new location the tag turns on the leader instead of bringing the tag along with it like it would for other tagged elements. When I move a room that already has a tag with a leader the leader will update and point to the new room location. However, if I decide to remove the leader the tag returns to the original room location, not its new home. I have to turn on the leader, to wake it up, so it will point to the new room location. Then I have to turn off the leader to get the room tag to jump to its new home. Here's an image of the sequence I describe above.

I should be careful to select the room tag and move it with the room. That doesn't contend with all the other possible views that have tags referencing the room though.

The documentation review and cleanup we have to do when rooms are relocated is a necessary part of the design process, with all the potential changes that can occur. In the past warnings were generated when a room and its tag(s) were not reconciled. We could then deal with those warnings by activating the Warning dialog and clicking the Move to Room button. When such a warning occurred while opening a model we could resolve them all at that time too.

Yes, we'd still have to review and fine tune them most likely but all the tags related to the room would at least be in the room. We can also choose to delete all the tags in a view and use Tag All Untagged. What if most of the room tags were positioned nicely with and without leaders? We'd lose all that work and have to do it over again.

It's my opinion that dragging a room's tag outside a room should be treated as different from dragging a room outside its boundaries and we should have a different result for each.

  • Drag a room tag away from its room and turning on the leader is cool and it should remain view specific.
  • Drag a room (to within new boundaries) should leave whatever condition is true for all of its room tags but move them along with the room proportionately (see next).
  • Drag a room and if there is no leader the tag should follow the room and not turn on a leader. If the leader is active then it should maintain its position relative to the room but move along with it.
  • Delete a room and the associated tags should be deleted too (which is what happens). We can then place that room elsewhere and tag as required.
Documentation review and adjustments are unavoidable but these actions should mitigate how extensive the task might be as well as be more consistent with what I'd expect to happen when I move rooms around.

Thursday, May 19, 2016

Tags Dimensions and Linked Files

I've mentioned this subject in the past. I'm writing to bring it up again and to focus on how Revit deals with tags and dimensions differently when we apply them to elements that are in linked files.

First as a reminder, when a linked file changes and a user reloads that link in their Local File other users are not necessarily seeing the same version of the Linked File. That's because reloading a link is a local change, a personal action, that doesn't get passed along to the Central File when we use Synchronize with Central (SwC).

Let's imagine User A has reloaded a linked model and they've placed tags on doors and rooms that they observe are now present in the link. User A uses SwC to share this new tagging effort. Now User B, who already has a Local File open, decides to use Reload Latest or SwC to share something they've done or see what work other users have contributed.

It's important to note that User B did NOT use Reload in Manage Links or via right-click on the linked file in the Project Browser FIRST. As a result User B gets the warning in the next image. Don't be confused by the mention of Coordination Monitor which can be confusing. It can make us think we're dealing with something that has been involved with the Copy/Monitor tools.


The Tags are Orphaned, they've lost their relationship with the linked file's elements they are supposed to identify. You can see one tag is highlighted in orange in the image above. In the next image we can see what the floor plan really looks like in the linked file (and what User A sees). It's not quite the same as what User B thinks it looks like is it?


Let's now imagine that User A continues to work by adding the dimensions you see in the image above too. After they finish doing that they use SwC.

User B now decides to use SwC or Reload Latest, AGAIN without using Reload on the linked file. Their reward is a larger collection of warnings (see next image). The first three warnings are dedicated to the dimensions User A added to their Local File. There are no equivalent elements in the version of the linked file that User B sees so Revit's only recourse is to delete them ... or ... choose Cancel ... which is actually a better choice. If User B cancels and then Reloads the linked file first that will eliminate the warnings entirely.


The remaining warnings are focused on the newly orphaned door and room tags that can't find their parent elements. If we select one of the orphaned tags we can either use Pick New Host or Reconcile Hosting. The former will need us to pick a door to associate the tag with. The latter will open the Reconcile Hosting browser which shows us everything that has been orphaned so far. We can select individual items and right-click to use Pick Host or Delete the tag if that's a better choice.


Keep in mind, once this orphaned status occurs it sticks. Merely reloading a linked file afterward isn't going to fix it. We'll be forced to deal with Reconciling Hosting. In some situations it might be faster to delete the tags and use Tag All to place them all over again.
This might be an opportunity for an enterprising developer to write a routine that looks at orphaned families and picks the closest possible host? Better still...Autodesk?
My recommendation, if you MUST use tags and dimensions on linked files?

Develop the habit of reloading the necessary linked files BEFORE using SwC or Reload Latest.

If you get the warning messages in the images above, use CANCEL. Make a note of the elements the warning(s) is(are) focused on. Most likely the warnings are being issued because you need to use Reload on the linked files first.

I'd also consider a moratorium on applying tags or dimensions to linked elements while the link is being changed aggressively. For example, if we know that the link is going to undergo some massive redesign we should just agree to stay away from tags and dimensions until it settles down again.

It's also a good idea to let other people know that you have changed an integral linked file so they can all use Reload (link) to catch up together.

Sunday, May 01, 2016

Revit 2017 - Calculated Values in Tags

This addition permits us to do the same thing to tags that we've been using in schedules. For example, in a tag I'd like to show the difference between the client required area and the actual area of a room. That wasn't possible without some export/import or Dynamo shenanigans. Now it is possible, right in a tag.


This starts in the Edit Label dialog via a new button, then it is the same as the dialog we've seen in Schedules.


Since these can be used in schedules and tags, and it has to be done separately for each use, it probably makes sense to document all of the formulas we use so they are easily harvested for another project. Build them into a template and there is less need to do that at all. Regardless it wouldn't hurt to have a Drafting View set aside with the text versions of all the formulas we use stored there. That way a simple Copy/Paste operation can harvest a formula to use in a tag or a schedule or both.

Friday, April 22, 2016

Revit 2017 - Upgrading Text Warning

In my earlier review of the text editor I included this warning:
When you upgrade from older projects you're going to have to deal with text changing to reconcile these changes. That means you CAN'T upgrade a project a couple days before a major deadline and expect to just hit print.
I should have also said that means anything that has text in it, like tags, title blocks and so on...

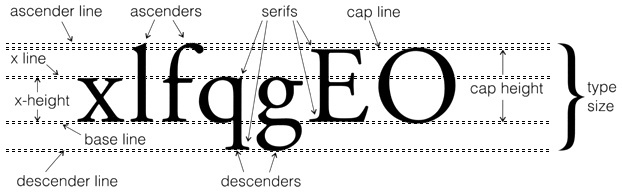
My post mentions that text height is defined differently, more like AutoCAD. The help documentation offers a graphic and an explanation of what has changed. I also marked up this image from Dynamic Statements to indicate how the text height is defined now. The overall height is based upon the capital letter M, measured from Base Line to Cap Height (for M). That's apparently more like how AutoCAD does it.


Brian Mackey (The Revit Geek's Blog) has written two posts about what he's observed happen with an upgrade so far. This is the FIRST and this is the SECOND post. Damien Ferlazzo (Revit Link blog) shares his experience upgrading text so far with his POST. Check out their posts.

I've also read a couple of threads in forums from users sharing what has happened with their TEST RUNS at upgrading. I emphasize that TEST RUNS because at this point that is exactly what we should be doing.
Please, please, pretty please with sugar on top...don't upgrade and expect to just carry on without reviewing everything very carefully. You (we all) have some text fixing to do!
P.S. As I was finishing this post I just heard from someone that they are having some issues trying to use the ALT codes for special characters via Character Map. I also heard that some text types were not editable at first but closing the view and opening it again helped for some reason. I'm sure there will be more to come as more people start using it seriously.

Tuesday, January 05, 2016

Doors and Rooms and Rooms and Doors

In the year 2016 we find Revit is still utterly clueless about the relationship between doors and rooms. We have this quirky documentation habit of using a room's number to derive a door number, not to mention it's room name to define its location in a building. I know they've noticed because each door has a From Room and To Room parameter.

Recently Elon Musk and his SpaceX team sent a rocket to space and returned the first stage to an upright position back on earth. A feat engineers have long dreamed of accomplishing.

Yet after 15 years Revit continues to rely on third party applications to bridge this feature crevasse.

Don't get me started on the Space Naming Utility being a separate application...grumble grumble...

Monday, February 09, 2015

Tags and Instance Parameters

I was thinking it would be nice to be able to create an instance parameter to turn on/off graphics in a given tag. Create one tag, place many and toggle on and off various parts. Revit says, "No, sorry Steve you can't do that."

Tags require us to create Types. The yes/no parameters turned on/off in each type as required. Then place a tag type that shows what you want to see or switch to a different type.

Making it possible to use instance parameters is a pretty common request, even reasonable perhaps. However, doing so would mean we couldn't trust that a given tag and type would be displaying all the information it is supposed to show without visiting each and every tag to verify.

Thus far that risk seems to have justified locking it down to only type based tag behavior.

Sunday, February 08, 2015

Leaders and Tags

A frequent source of frustration is how leaders relate to the information in tags. The more complicated a tag family is the harder it becomes to ensure the tag's leader(s) will align with the graphics or text it has. A leader connects to the midpoint along the overall extents of a tag's graphics and labels. Imagine a rectangle that surrounds all of the graphics in your tag (see and unseen), the overall extent of that information. The leader connects to the midpoint on this rectangle on each of its four sides as you drag the leader around the tag.


It is possible to play tricks with invisible lines to increase or decrease the perceived size of the tag so this elusive midpoint leader connection point can be controlled. It takes some experimentation and only one little circumstance we didn't anticipate to mess things up. This is just a simple example, using the stock room tag family, that illustrates how the leaders are too arbitrary.


They work okay for a couple instances but for others they don't. In this case Volume isn't getting calculated at the moment so the information displayed is too long and it messes up the leader location. In a big enough room the calculated volume value could easily be long enough to do the same thing to the tag.

We want/need a definitive way to tell Revit where a leader should connect to the tag information. I recently ran across a suggestion that I'd love to see happen. You probably already know that Revit MEP content uses connectors to define where pipe/duct/electrical relationships start or connect. What if we had a Leader connector element we could add to our tag families? Something like this perhaps?


I've added numbers to define the priority for the leader connectors, like adaptive point families have for example. As I drag a leader around a tag Revit should adjust the leader shoulder to connect to the next numbered connector. For those that are close to one another (in the same quadrant) the TAB key should cycle, or just cycle through all the possible connectors.

The information supplied to the parameters displayed in a tag could still mess up the leader location but no solution will be perfect. At least with a specific location we can concentrate on designing a tag that will work nearly perfectly. If we can't control the length of the data in the labels then we just need a way to adjust the connector's location relative to the information. This means we'd need to be able to add dimensions and constrain the connector locations with parameters too.

I'd also love to be able to use a parameter to control the length of a label in a tag. This would allow us to increase the overall length of the data that shows up before wrapping to a new line. Combining that with parameters to control the location of leader connectors would provide considerable control of the tag and its leader(s).


Tuesday, August 05, 2014

Tagging Elements

It is pretty common to have quite a few different kinds of tags for the elements we need to tag in views. Some equipment might get an oval shaped tag while others have a hexagon. When we need to switch between tags Revit isn't quite fine tuned for this yet. Here's three approaches we can take.

When you tag elements you can tell Revit which tag should be used by default via the Loaded Tags dialog. The tag that appears next to a category is the tag that will be used when you use Tag by Category. If you work systematically you can set which tag you intend to use for awhile and then the correct tag will be offered by default.


Another way to do it is Right Click > Create Similar (you can select one and click the Create Similar button on the ribbon too) over a tag that is the kind you want to place, assuming one is already in the view. This way Revit will start tagging with that tag.

Yet another approach is to select everything you want to tag and then use Tag All, choosing the tag type you'd like to use. When you select elements first this dialog changes Revit's focus to tag selected elements instead of everything that isn't already tagged. This gives you a bit more control over which tag should be used on which elements.

A tagging quirk is that Revit won't let us put more than one tag on the same element. For example I like to use a pipe tag to identify CW (cold water) or HW (hot water) pipes. I can put one tag on a pipe but Revit won't recognize the pipe as available unless I tag a different pipe first. My work around is to bounce back a forth between pipes. It seems a little silly not to let me put another tag on a pipe if I want too.

Sunday, May 18, 2014

Revit 2015 Tag Leader Snapping

Revit 2015 has changed how tags and their leaders behave. They are more similar to text and their leaders. Specifically Revit respects the length and position of the leader's shoulder. When we drag the tag, using the move/grip, the leader's shoulder stays intact, follows the tag.

In the past, Revit left the grip for the end of the shoulder in the original location and we had to move it, an extra step, to revise its position relative to the tag. Unfortunately I've noticed that tags don’t seem to snap into alignment with each other as well now.


You'll see in the video above that when I move the tag it doesn't see the other tags. I find it unfortunate and a bit ironic that I have to purposely move the shoulder away to get the tag to snap into alignment with another tag and then fix the shoulder.

Ironic since I have to use the extra step to get the snapping behavior I want, the extra step the new feature is suppose to eliminate. This could be limited to my computer and its graphics card and driver. I'm curious if others can confirm this is happening for them too.

2014 Revit OpEd

Monday, July 15, 2013

Revit MEP - Free Size Parameter

If you use the Free Size parameter instead of Size you might notice a subtle anomaly.

In elevation views where we only see one dimension of a duct Free Size does not switch between WxH and HxW, the Size parameter does switch. In other views they both display width x height. In section or elevations that show the profile of a duct both dimensions are measurable and each parameter is consistent, they default to Width x Height.


It does seem like an oversight on their part, they ought to be consistent whether we use Size or Free Size.

Wednesday, May 29, 2013

Tag Slope of a Ramp

We can apply the Spot Slope annotation to a ramp but it isn't very useful because, while Revit does acknowledge the ramp element, when you attempt to tag it you see [no slope] (image using 2014).


Alfredo replied to my previous post with a tip in his comment:
    If you first place the spot slope tool on a floor and then move the slope annotation to a ramp, it works!

In this image I've dragged a slope annotation from a floor element over to a ramp element and it recognizes the ramp's slope!


Definitely quirky and subtle but at least it is possible after all. A word of caution, it will probably be necessary to check the slope value before printing, for example if Revit regenerates information because the ramp is altered. The tag could could start to report [no slope] again. Fwiw, in my casual testing so far it hasn't broken the slope value even after altering a ramp's parameters. Your mileage may vary...

Tuesday, February 12, 2013

Rotate with Component

This little setting is meant to force a tag to rotate with the tagged element, meaning to maintain the alignment.


The easiest example is beam or wall tags following their parent.


These categories respond to Rotate with Component:
Walls, Curtain Walls, Doors, Windows, Railings, Ramps, Stairs (Runs, Landings and Supports), Structural (Framing, Braces and Trusses), Property Boundary, Property Line Segments, Planting, and Parking.

These categories are immune to Rotate with Component:
Foundations, Floors, Ceilings, Roofs, Furniture, Furniture Systems, Casework, Generic Models, Structural Columns, Detail Components, Massing, Mass Floors, Curtain Panels, and Specialty Equipment.

Breaking loose from "Revity rules" the space, room and area tags are allowed to rotate more easily by choosing Vertical, Horizontal or Model, for each tag we use. The Model option allows us to use the Rotate tool to rotate them freely, which would be quite nice for any tag.

Architectural Columns, Shaft Openings remain immune to tagging by category at all.

That seems like a long list but that doesn't even factor in MEP components. Perhaps I'll tackle that another night.

Saturday, February 09, 2013

Leaders

I know people care a lot about where leaders start on blocks of text. Some want them to start at the first line, others at the bottom line and still others at the center of the text. Personally this has always felt like fussiness, focusing on trees and missing the forest. For eleven years I spent some of my time reading drawings to either bid on a project or to try to build something with them. I never got upset about such things. I WAS frustrated when the leader didn't point at the correct thing or fell short of "something" to point at. Where the leader started never confused me as long as it was clear which note it belonged to.

For my time and money, as long as they are consistent I'm satisfied. Unfortunately Revit isn't in this regard. Text has settings for leader positioning that keynote tags don't. That can lead to inconsistency and that's not good. Any annotation features that are available for text should be extended to other elements that display information that sure looks like text when looking at a printed sheet of paper. My 2.5 cents.

Friday, January 27, 2012

Occupancy Data Application

I've written about the workaround solution for documenting occupancy information in room tags in the past. I've even shared a sample project file based on the work I did for Scott Davis' past firm WLC Architects in 2005 (before he joined Autodesk). Until the API came along we were faced with a semi-inelegant solution that involved manual data entry and checking before plot day. Even after the API nobody really addressed this issue directly, till now...

Rahul Shah (blog: Revit Sticky Notes) works for Wood Bagot in the UK. He responded to a query at AUGI with a promise to write an application to push a calculated value to make Occupancy information taggable. He posted his solution today on his BLOG.

His written instructions on the blog post are:

    NOTE: In order to use this plugin you will have to add "Occupancy Load Factor (as area type)" and "Occupancy Load (as integer type)" shared parameters to your project file and assign them to Room object as Instance. Also, calculated occupany load value is not dynamically linked with other values so if you change room size or occupany load factor then you will have to rerun this tool to update occupancy load value. Please read the Readme.txt file contained in the zip file for more information.

You can DOWNLOAD IT NOW!

Tuesday, October 11, 2011

Elevation Tag Update Not Happening

Uh oh Spagetti O's... with the recent update I've noticed that the elevation annotation tags do not update when the their detail number values are changed. I don't recall this happening before the update but it's definitely going wrong now.


I find it necessary to change the annotation type to another or alter a setting in the family before Revit will "wake up" and change the tag to the new value. Boohoo...

Here's a quick VIDEO to demo the issue.


Monday, March 08, 2010

Dept. of Subtle - Window Tagged Twice

A client recently reported a strange tag situation. When they changed the tag value another window's tag would change too. Not strange to me, the tag is displaying the Type Mark parameter, correct? No they replied, "We don't do that, we tag each window with a unique number so our tag displays the Mark parameter."

Now I'm curious...well it was too easy. The tag was tagging the same window as the other tag. Select the tag, add a check in the Leader Option and we could see where the tag thought its window really was. Here's a video to show what I'm writing about.


Wednesday, February 03, 2010

Dept. of Subtle - Offset Elevations at One End

This post has a Revit Structure bias. When you want to offset the end of one beam to slope framing it isn't obvious which end is which. There is a Start Level Offset and and End Level Offset.


When you examine the properties dialog you see them listed nicely but when you just look at a beam there isn't anything obvious to tell you which end is which. Even if you understand which end comes first you probably won't remember how you placed the beam later when you want to change it.

I recall someone telling me that they have everyone sketch left to right and top to bottom so that the Start Level offset is always at the left and top of a beams. Good luck with that! 8-).

If you select a beam however the offset parameters are displayed and if you place your cursor over the offset value you'll get a nice useful tool tip!


For you VIDEO minded folks here's one.


Wednesday, September 02, 2009

Revit MEP - Duct Size in Tags

This is subtle but RME changes how the size of a duct is listed in the tag according to the view orientation of the view that you place your tags in. In plan you get this for a 36" wide x 24" high duct.


In elevation/section however you get this for the same duct.


This convention is defined by the practice of listing the visible (what we see in the view) dimension first. In plan width is visible so it is first. In elevation/section the height is visible and therefore first in the tag values.

Tuesday, November 18, 2008

Dept. of Unfair - Placing Tags

When you place most tags Revit doesn't offer the option of choosing a specific tag prior to selecting the element to tag. They depend on the current tag assignment. This is managed via Settings menu > Annotations > Loaded Tags. The listed tag is THE tag that Revit will use. Revit uses/assigns the most recent/last tag loaded into your project for its category in this spot.

Room/Space tags permit us to choose which one we want first, from the Type Selector. It would be good if all tags did too! It is quite common to have multiple tags loaded for many different categories and therefore being able to choose which one to place would be great!

A workaround exists however...

When you use Tag all not Tagged AND have some elements selected Revit will select an option on the resulting dialog.


This will tag just what you select AND allow you to choose which tag to use. Almost the same thing. It would be nice to have a consistent tagging approach though.

Wednesday, September 10, 2008

Wish - Calculated Values in Tags

This is a common wish. We want to be able to DISPLAY calculated values not only in schedules but also in tags. Right now lacking this feature makes me feel like this guy!


Thanks to this site for the image.

Amended 09/11/08 - Per the comment, note that I'm asking to DISPLAY a calculated value in a tag. I'm not telling anyone how to accomplish it. I'm asking to be able to use a tag family to report a value that is the result of a calculation in a project relative to any element.