Monday, July 31, 2023

Dept of Subtle - Select Everything in a Property's Field

Sharing this because someone observed me selecting a parameter value and was curious about how I selected everything. If they didn't know...maybe you don't either?

When you just click in a parameter field in the Properties Palette or Type Properties dialog the cursor will usually land where you click. You can use Home or End keys to move the cursor to beginning or end of the entry. You can also use the CTRL + A button to select everything in the field.

If you want to select all of (with the cursor) what is entered, in order to replace it entirely, this is very subtle...

When you move your cursor over the field, as you click...drag the cursor arrow down (or up) away from or out of the field. Done correctly it will select everything in the field. Once familiar with the motion it is quite easy to do.

Originally I realized that clicking in a field past the end of the entry (in empty space) would select everything. That was useful to me but the width of the field is usually not wide enough to do that every time. Yet, every now and then when I clicked in a field I'd select everything. Eventually I took time to notice why it was happening. Happy selecting?!

Saturday, July 29, 2023

Move Room Tool

Following on yesterday's post about rooms and their tags. It occurred to me that a Move Room tool might be helpful (via Dynamo or app). I imagine being able to start the command and choose a room. Then I'd choose between options for This Floor or Another Floor.

If This Floor is selected I'd choose between options for Move All Associated Tags or Delete All Associated Tags and then I'd be prompted for a new location.

If Another Floor is selected then under the hood the room would be deleted, I'd choose between tag options, and then prompted to choose another plan view to open, followed by placing the room in the new location.

Multiple room selection might be useful too? I don't often move a collection of rooms together. It's certainly possible that could be necessary and very helpful if so.

Whatcha think?

Friday, July 28, 2023

Room Tags and Leaders

For many years I wished room tags would turn on a leader IF I dragged a room tag outside of the room's boundary. I got my wish in Revit 2023.1. I also got more than I wished for which is not that uncommon unfortunately, thus the saying, "Careful what you wish for".

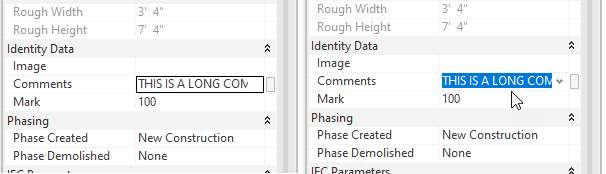
When we are moving rooms around things go awry. If we drag a room to a new location the tag turns on the leader instead of bringing the tag along with it like it would for other tagged elements. When I move a room that already has a tag with a leader the leader will update and point to the new room location. However, if I decide to remove the leader the tag returns to the original room location, not its new home. I have to turn on the leader, to wake it up, so it will point to the new room location. Then I have to turn off the leader to get the room tag to jump to its new home. Here's an image of the sequence I describe above.

I should be careful to select the room tag and move it with the room. That doesn't contend with all the other possible views that have tags referencing the room though.

The documentation review and cleanup we have to do when rooms are relocated is a necessary part of the design process, with all the potential changes that can occur. In the past warnings were generated when a room and its tag(s) were not reconciled. We could then deal with those warnings by activating the Warning dialog and clicking the Move to Room button. When such a warning occurred while opening a model we could resolve them all at that time too.

Yes, we'd still have to review and fine tune them most likely but all the tags related to the room would at least be in the room. We can also choose to delete all the tags in a view and use Tag All Untagged. What if most of the room tags were positioned nicely with and without leaders? We'd lose all that work and have to do it over again.

It's my opinion that dragging a room's tag outside a room should be treated as different from dragging a room outside its boundaries and we should have a different result for each.

  • Drag a room tag away from its room and turning on the leader is cool and it should remain view specific.
  • Drag a room (to within new boundaries) should leave whatever condition is true for all of its room tags but move them along with the room proportionately (see next).
  • Drag a room and if there is no leader the tag should follow the room and not turn on a leader. If the leader is active then it should maintain its position relative to the room but move along with it.
  • Delete a room and the associated tags should be deleted too (which is what happens). We can then place that room elsewhere and tag as required.
Documentation review and adjustments are unavoidable but these actions should mitigate how extensive the task might be as well as be more consistent with what I'd expect to happen when I move rooms around.

Thursday, July 20, 2023

Slanted Walls Don't Miter

What if I'm asked to create a vertical bottom wall that will transition into a slanted upper wall? Initially the wall configuration looks like the walls on the left in the following image. I added another vertical wall at the top of the slanted portion just for fun.


Each wall doesn't know anything about the other so there is no attempt by Revit to miter them together. We might have expected them to join? If we consider what happens in plan views for a similar layout (see image) I don't think it's unreasonable to think that might have happened. If an automatic join occurs in plan views maybe using Join will work in a section? No. Wall Join tool? No. Attach? YES!


To resolve the clumsy look of the left walls and end up with those on the right side of the image we can take advantage of the Attach tool. We just need to add reference planes to define where the miter joint should occur. Then Attach - Top will fix the bottom wall and Attach - Base will fix the upper wall. Repeat as required until all walls relate to each other better.


Thursday, July 13, 2023

Phasing and Replacement Windows

Over the years people have often complained about trying to document replacing existing windows with modern windows but maintaining the existing opening. This means swapping windows with families that are the exact same size. This is related to the wall that Revit creates to infill a wall that has a demolished window. You may have encountered this warning message?


That message appeared when I attempted to place new windows in the New Construction phase after demolishing the existing windows first. I was careful to set up views assigned to different phases and phase filters so there wouldn't be any display conflicts.

I got interested in this issue again recently because of a thread at the Autodesk User Forums for Revit Architecture. A fellow member was sharing how much trouble Revit has been giving them trying to do this kind of work. After some back and forth I narrowed it down to one window family and another member realized that family uses a void to cut the hosting wall in the family itself versus the usual opening.

This led me to write some hypotheses for testing purposes. I wrote:

Hypothesis A: Within phasing we can replace Existing Window A with New replacement Window B using the exact same sizes (same size opening dimensions) IF they both use an OPENING in the family to cut the host.

Hypothesis B: Within phasing we can replace Existing Window A with New replacement Window B using the exact same sizes (same size opening dimensions) IF they both use a VOID in the family to cut the host.

If either of the above are false then...

Hypothesis C: Within phasing we CANNOT replace Existing Window A with New replacement Window B using the exact same sizes (same size opening dimensions) IF one uses an OPENING and the other uses a VOID, in the family, to cut the host.

I did some testing using the latest release of Revit, 2024.1 and I determined the following:

Hypothesis A is TRUE
Hypothesis B is FALSE
Hypothesis C is neither

I find that I can replace a Void based window with an Opening based window but not the reverse. Also any alterations to the hosting wall in the project; such as length adjustment, or top/bottom offsets, attach/detach will place the void type window at risk of being deleted. Weirder still is that it might not delete all of them, one or more.

It seems that the short answer is: eliminate window families that use a void to cut the hosting wall IF you intend to place identical sized windows in phased projects; to demonstrate existing window replacement without altering the existing openings. Windows created this way will not work for this task. A logical next hypothesis is to anticipate similar behavior in door families.

I speculate that this warning happens because an opening cuts fully through the host while a void (or combination of voids) might cut more and/or less of the host as it travels through it. I suspect that the infill wall can't abide the shape a void might create and that in turn means a void won't be viable as a window to alter the location of the infill wall. I think it's similar to curtain walls only supporting non-rectilinear panels with the system panel families.

I'd love to hear that the developers will test this against their own experience and expectations. I know that a lot of people rely on voids to shape the opening in a host wall to match a variety of actual construction techniques for openings. To eliminate voids in families as an option for this kind of project (replacement windows (and doors?)) is not ideal. They'd probably have to revisit the entire logic of infill elements where demolished hosted elements occur. Perhaps leave it up to us to fill in holes?

Wednesday, July 12, 2023

Revit 2024.1 Now Available

 Like the post title says, the latest release/update is now available. Read all about it at The Factory blog.