I've written about Temporary Dimensions and the Activate Dimension button in the past (2007-9), these are some posts that discuss them.
Space Bar Subtle Effect on Temporary Dimensions
Dept. of Reviteristics - Activate Dimensions
Activate Dimensions
Activate Dimensions - Redux
Temporary Dimensions don't appear when two or more elements are selected. When that happens you should see the Activate Dimensions button appear on the Options Bar.
Temporary dimensions also don't respond to families that host nested shared families. That's because these families are also regarded by Revit, under the hood, as a selection of two or more elements.
Welcome to Steve Stafford's Blog ~ Revit OpEd = OPinion EDitorial ~ My view of things Revit, both real and imagined.
Tuesday, March 22, 2016
Tuesday, March 15, 2016
Revit Updates for 2015 and 2016
New updates are available for both Revit 2015 and 2016 now. The latest for 2015 is Update Release 13 and we're up to Update Release 3 for 2016. Hopefully the Autodesk Application Manager let you know already, it did for me this time. Visit your Autodesk Account page to download them if not.
These are the three related release note files that The Revit Clinic shared the other day.
Revit 2015 Update Release 13 readme and release notes
Revit 2015 Update Release 13 for R2 readme and release notes
Revit 2016 Release 2 Update 3 readme and release notes
These are the three related release note files that The Revit Clinic shared the other day.
Revit 2015 Update Release 13 readme and release notes
Revit 2015 Update Release 13 for R2 readme and release notes
Revit 2016 Release 2 Update 3 readme and release notes
Thursday, March 10, 2016
Type Catalog - Family Type Parameter and Missing Spaces
This is for the Department of I could kick myself or Dept. of why can't I remember this.
These are two images of the same Type Catalog, one works and the other doesn't. The key location of the issue/difference is marked in yellow. This first one won't work.
Two little spaces on either side of the colon, like this: Family Name : Family Type.
These are two images of the same Type Catalog, one works and the other doesn't. The key location of the issue/difference is marked in yellow. This first one won't work.
Two little spaces on either side of the colon, like this: Family Name : Family Type.
Note to self, remember this next time around knucklehead!
Monday, March 07, 2016
Line Styles Embedded in Families
Reading a thread at AUGI tonight prompted this post. Line Styles aren't a thing in Revit families, the option is disabled if you attempt to review them while in the Family Editor UI.
The family discussed in the thread seems innocent enough until it is loaded into a project file. These are the line styles that are in the default template (imperial).
This is the same dialog after loading the family; nearly 100 more (98) line styles show up.
The culprit is Transfer Project Standards (TPS). It is easy to transfer line styles from a project to a family. We need Object Styles in families not Line Styles. Make sure you don't select Linestyles when/IF you use TPS.
If you've already got many rogue Line Styles you can delete them from the project and in Revit 2016 you can select more than one at a time and click Delete. Just remember if Delete is disabled then you've got a built-in (system) line style selected.
What about cleaning out the family itself? They don't give us a tool to do that. Purge Unused doesn't see them unfortunately. Robert Bell, in the AUGI Thread, offers a solution though. Load the bad family into a empty template (choose the None option for example). Delete all of the line styles you don't want. Then Save the family and overwrite the original. If the family is already loaded into your project just do the same thing, delete the line styles (it's just a little harder to tell) and Save the family to overwrite the original.
While you're at it, don't use TPS on Line Patterns, like shown in the image above. You'll probably get many more than you really want too. Those can be deleted a bit more easily though.
I checked the Autodesk Exchange Apps site to see if any offer a way to purge line styles from families. I found one that does it for projects but none that claim to do it for families; at least not based on searching for that criteria. It might be something Dynamo can be used to resolve; I'll have to check into that.
---------------------
Update 08/22/2016: Dale Bartlett has shared an app to purge these embedded line styles.
Update 05/09/2017: The file is no longer where Dale shared it, I don't know where it is now so I've removed the link.
Update 05/15/2017: Dale provided a new link to a 2017 compatible version VIA THIS URL.
The family discussed in the thread seems innocent enough until it is loaded into a project file. These are the line styles that are in the default template (imperial).
This is the same dialog after loading the family; nearly 100 more (98) line styles show up.
The culprit is Transfer Project Standards (TPS). It is easy to transfer line styles from a project to a family. We need Object Styles in families not Line Styles. Make sure you don't select Linestyles when/IF you use TPS.
If you've already got many rogue Line Styles you can delete them from the project and in Revit 2016 you can select more than one at a time and click Delete. Just remember if Delete is disabled then you've got a built-in (system) line style selected.
What about cleaning out the family itself? They don't give us a tool to do that. Purge Unused doesn't see them unfortunately. Robert Bell, in the AUGI Thread, offers a solution though. Load the bad family into a empty template (choose the None option for example). Delete all of the line styles you don't want. Then Save the family and overwrite the original. If the family is already loaded into your project just do the same thing, delete the line styles (it's just a little harder to tell) and Save the family to overwrite the original.
While you're at it, don't use TPS on Line Patterns, like shown in the image above. You'll probably get many more than you really want too. Those can be deleted a bit more easily though.
I checked the Autodesk Exchange Apps site to see if any offer a way to purge line styles from families. I found one that does it for projects but none that claim to do it for families; at least not based on searching for that criteria. It might be something Dynamo can be used to resolve; I'll have to check into that.
---------------------
Update 08/22/2016: Dale Bartlett has shared an app to purge these embedded line styles.
Update 05/09/2017: The file is no longer where Dale shared it, I don't know where it is now so I've removed the link.
Update 05/15/2017: Dale provided a new link to a 2017 compatible version VIA THIS URL.
Friday, March 04, 2016
Worksharing Display - Owners
The first thing I do when a project is open, to get a sense of things going on around me in the model, is to toggle on Worksharing Display - Owners (see image). That gives me a quick snapshot of who else is working on things around me.
If I see a color on anything I thought I'd start working on then there is no point attempting to edit those, I'll just get a warning from Revit in response. The mere presence of colors indicate other people are around, in this context. Hovering over one element brings up a larger tool tip than the usual information we get, including which person is currently editing it.
I use the Worksets option for Worksharing Display just to see if things are obviously assigned incorrectly. Again, hovering over any element tells me what workset it is assigned to in either the normal tool tip (first thing displayed, unless Design Options are involved too) or the expanded one for Worksharing Display.
I think most people forget about or overlook the Gray inactive worksets option too. That helps me cope with my nemesis Active Workset because it reminds me which workset is active because the things around me are either bold or not (see image).
Prompted by a reply to a thread at RFO.
If I see a color on anything I thought I'd start working on then there is no point attempting to edit those, I'll just get a warning from Revit in response. The mere presence of colors indicate other people are around, in this context. Hovering over one element brings up a larger tool tip than the usual information we get, including which person is currently editing it.
I use the Worksets option for Worksharing Display just to see if things are obviously assigned incorrectly. Again, hovering over any element tells me what workset it is assigned to in either the normal tool tip (first thing displayed, unless Design Options are involved too) or the expanded one for Worksharing Display.
I think most people forget about or overlook the Gray inactive worksets option too. That helps me cope with my nemesis Active Workset because it reminds me which workset is active because the things around me are either bold or not (see image).
Prompted by a reply to a thread at RFO.
Monday, February 22, 2016
Detach from Central and the Specify Worksets Option
When we use Detach from Central (DfC) this message may pop up from time to time.
It can be a confusing to see it because quite often the very notion of using DfC is to deal with the fact that the Central File has been moved or copied, like when a consultant sends us a copy of their project file. We use DfC to create our own copy of their project on our server and project folder.
My initial reaction to it is, "Yeah...duh...why do you think I'm using DfC Revit?" Well to be fair, the reason the message appears is that the Central File was saved using the Save As > Options... Open Workset default: Specify (see next image). Revit is attempting to open that dialog before actually beginning the DfC process (technically).
Taking advantage of this concept means that we don't have to remember to choose Specify Worksets when we open a project, it is the default choice.
This is one instance where cavalierly clicking Close, thinking yeah whatever...is okay.
It can be a confusing to see it because quite often the very notion of using DfC is to deal with the fact that the Central File has been moved or copied, like when a consultant sends us a copy of their project file. We use DfC to create our own copy of their project on our server and project folder.
My initial reaction to it is, "Yeah...duh...why do you think I'm using DfC Revit?" Well to be fair, the reason the message appears is that the Central File was saved using the Save As > Options... Open Workset default: Specify (see next image). Revit is attempting to open that dialog before actually beginning the DfC process (technically).
Taking advantage of this concept means that we don't have to remember to choose Specify Worksets when we open a project, it is the default choice.
This is one instance where cavalierly clicking Close, thinking yeah whatever...is okay.
Sunday, February 21, 2016
Clearance Subcategory in Linked Files and Families
You've linked a model that has families which include clearance elements. That's excellent for doing clash detection. However you may not really want to see the graphics they've provided for this in all of your own documentation views.
Hopefully the clearance elements have been assigned to a unique subcategory that you can control by overriding the link's Visibility/Graphics.
If so and you'd like to control the subcategory without overriding their linked file you can use Copy to Clipboard on one of the families (TAB to select it) with the clearance elements in them. Then paste a copy somewhere in your model. Now the family's subcategories are part of your own model. You'll be able to control it via V/G without overriding the link, assuming the link is assigned to By Host.
You probably realized that doing the above is a shortcut to creating a matching subcategory assigned to the correct category in Object Styles ourselves. It is a shortcut because we probably won't know what subcategory the family is using without examining the family more closely, by opening the linked file and editing the family directly. Using Copy and then Paste provides us with a copy we can interact with directly instead and any subcategories it has are brought into our project for us.
Families are prone to inconsistency because they can be obtained from a variety of sources. Consider that even the families from Autodesk aren't entirely consistent from one to another. It may still be necessary to crack open a family to find out how their clearance elements are controlled. For example, the lines that form the "X", and the "box" around them, in this family are assigned to the Hidden Lines subcategory, not Clearance.
In 3D there are forms to indicate clearance requirements and they are assigned to a Clearance subcategory but they also have their Visible parameter unchecked which means we can't see them in the project at all, anywhere.
This family does not intend for us to turn off the clearance "X", at least not via its Clearance subcategory. It has a subcategory called clearance and the solid forms for its clearance zones are assigned it but then it was decided they shouldn't be visible at all. By the way, doing so does not prevent Revit from seeing the clearance forms when using its own Interference Checking. However in Navisworks they don't show up. That might be considered bad form (pun intended). From a family editor perspective (and user), it would have been more flexible if the Visible parameter had been associated with a Yes/No parameter to allow us to turn it on or off if necessary. Unfortunately, keeping in mind that this post began about families in a linked file, it wouldn't make any difference for us.
Consistency is easier to manage and achieve when it is your own content library and your project files. It can be a bit trickier dealing with the content that is part of the linked files you need from other disciplines. It's easy to create a family that makes me happy, or my team. It may not make the other consultants happy though. Something to think about while you're being happy making content.
Hopefully the clearance elements have been assigned to a unique subcategory that you can control by overriding the link's Visibility/Graphics.
If so and you'd like to control the subcategory without overriding their linked file you can use Copy to Clipboard on one of the families (TAB to select it) with the clearance elements in them. Then paste a copy somewhere in your model. Now the family's subcategories are part of your own model. You'll be able to control it via V/G without overriding the link, assuming the link is assigned to By Host.
You probably realized that doing the above is a shortcut to creating a matching subcategory assigned to the correct category in Object Styles ourselves. It is a shortcut because we probably won't know what subcategory the family is using without examining the family more closely, by opening the linked file and editing the family directly. Using Copy and then Paste provides us with a copy we can interact with directly instead and any subcategories it has are brought into our project for us.
Families are prone to inconsistency because they can be obtained from a variety of sources. Consider that even the families from Autodesk aren't entirely consistent from one to another. It may still be necessary to crack open a family to find out how their clearance elements are controlled. For example, the lines that form the "X", and the "box" around them, in this family are assigned to the Hidden Lines subcategory, not Clearance.
In 3D there are forms to indicate clearance requirements and they are assigned to a Clearance subcategory but they also have their Visible parameter unchecked which means we can't see them in the project at all, anywhere.
This family does not intend for us to turn off the clearance "X", at least not via its Clearance subcategory. It has a subcategory called clearance and the solid forms for its clearance zones are assigned it but then it was decided they shouldn't be visible at all. By the way, doing so does not prevent Revit from seeing the clearance forms when using its own Interference Checking. However in Navisworks they don't show up. That might be considered bad form (pun intended). From a family editor perspective (and user), it would have been more flexible if the Visible parameter had been associated with a Yes/No parameter to allow us to turn it on or off if necessary. Unfortunately, keeping in mind that this post began about families in a linked file, it wouldn't make any difference for us.
Consistency is easier to manage and achieve when it is your own content library and your project files. It can be a bit trickier dealing with the content that is part of the linked files you need from other disciplines. It's easy to create a family that makes me happy, or my team. It may not make the other consultants happy though. Something to think about while you're being happy making content.
Friday, February 19, 2016
Keyboard Shortcut and View Template Conflict
It is obvious when you think about it but when you are trying to use a keyboard shortcut and it doesn't work you might be tempted to think, "That's strange it used to work?!". Off we go to check our keyboard shortcut settings...then..."OH, the view has a View Template assigned to it!"
When a View Template is Assigned to a view, via the view's properties (yes, that's different from applying a view template), the template blocks our access to those settings it is in charge of. When we open Visibility/Graphics we see the categories are disabled (gray). Any keyboard shortcut we attempt to use that involves one of those settings is likewise affected.
In my case tonight I was trying to use keyboard shortcut VH (Hide in View > Category) but nothing happened. Yes, it was just a View Template being bossy. Had me going for a second...
When a View Template is Assigned to a view, via the view's properties (yes, that's different from applying a view template), the template blocks our access to those settings it is in charge of. When we open Visibility/Graphics we see the categories are disabled (gray). Any keyboard shortcut we attempt to use that involves one of those settings is likewise affected.
In my case tonight I was trying to use keyboard shortcut VH (Hide in View > Category) but nothing happened. Yes, it was just a View Template being bossy. Had me going for a second...
Friday, February 05, 2016
Revit MEP - Silly Revit - We Don't use those Pipe or Duct Sizes
If you don't take the time to fine tune your project templates then you'll find Revit will offer you all kinds of pipe and duct sizes. These are available in the drop down lists during placement and then later if you run Duct/Pipe Sizing.
If you don't take the time to fine tune your template you'll find Revit gives you a duct size of 11" after completing its Duct Sizing, regardless of the fact you only choose from even sizes. It's easy to blame silly Revit...but it's our fault. The Duct and Pipe Sizes are controlled via Mechanical Settings, the duct sizes for Rectangular are shown below.
We need to either delete sizes we never want or just un-check them in either column or both, Set it and forget it.
Oh, the same is true of conduit and cable tray.
If you don't take the time to fine tune your template you'll find Revit gives you a duct size of 11" after completing its Duct Sizing, regardless of the fact you only choose from even sizes. It's easy to blame silly Revit...but it's our fault. The Duct and Pipe Sizes are controlled via Mechanical Settings, the duct sizes for Rectangular are shown below.
We need to either delete sizes we never want or just un-check them in either column or both, Set it and forget it.
Oh, the same is true of conduit and cable tray.
Labels:
Configuration,
Customization,
Duct,
Fittings,
Pipe,
Revit MEP,
Sizes,
Sizing,
Templates,
Types
Thursday, February 04, 2016
Group Exclude Element and Rooms
We can use the Exclude Element feature on the parts of the model we assign to groups, like this for example (a workstation with chairs).
We can also include rooms in groups. Just be careful if you use Exclude Element on the room(s). If you do you'll see a hint of a room when you pre-select (highlight) the group but you won't find it among the rooms in a room schedule...because it/they is/are excluded.
A potential gotcha for users.
We can also include rooms in groups. Just be careful if you use Exclude Element on the room(s). If you do you'll see a hint of a room when you pre-select (highlight) the group but you won't find it among the rooms in a room schedule...because it/they is/are excluded.
A potential gotcha for users.
Tuesday, January 26, 2016
Revit Extension and the Big Pause
I've noticed that when I start sketching walls in a new project that at the third segment Revit decides it needs to PAUSE before continuing. It seems it has something to do with having Revit Extensions installed. It thinks needs to add some parameters and interrupts my sketching to do that. Bill (Mr. BIM Thoughts) helped point me toward this bugger the other day when were discussing a few workstations that were pausing to install/update the extension...much worse pause.
If you experience this too...might be the same situation for you.
Monday, January 25, 2016
Revit Version Build Update and Service Pack Naming
Bill (Mr. BIM Thoughts) shared this subtle bugger with me the other day.
Oooh boy... so Revit 2016 R2 is called Update3 behind the scenes if you look at the Control Panel\Programs\Programs and Features > View Installed Updates and Revit 2016 R2's update is called Update 1 for R2...
Phew...just when I think I understand the naming...
Oooh boy... so Revit 2016 R2 is called Update3 behind the scenes if you look at the Control Panel\Programs\Programs and Features > View Installed Updates and Revit 2016 R2's update is called Update 1 for R2...
Phew...just when I think I understand the naming...
Wednesday, January 20, 2016
Worksharing - Loading Content Part 2
In my previous post I recommended a point person be assigned to manage the loading of content for a team. That might sound like a beauracratic minded recommendation. Not me at all. It is more a matter of self preservation, wishing to avoid having to fix the resulting duplication before it becomes a bigger problem. As such there is a another minor measure we can take to help catch the issue when it occurs and fix it.
Always use Synchronize with Central (SwC) immediately after loading new families or types (or duplicating system family types). Don't place any instances.
If we can't get a single person to manage this loading then using SwC immediately afterward will increase the odds that a warning message will appear as soon as the transaction is completed. This does assume that we all develop this habit. If the warning appears than we need to examine the new family(ies) and or type(s) in the Project Browser and resolve the issue.
The goal is to avoid creating the duplicates and even more importantly using them in the project.
Labels:
Advice,
Families,
Family,
Issues,
Tips,
Troubleshooting,
Types,
Warnings,
Worksets,
Worksharing
Thursday, January 14, 2016
Worksharing - Loading Content
I read Jason's post this morning and he describes a classic worksharing gotcha. Unfortunately he hasn't identified the true culprit. I'm referring to this part of his post specifically.
This error and situation is easy to replicate.
For example, if eight people all introduce the same new family to the project then by the time the last person uses SwC there will be eight versions of this family listed in the Project Browser. This is what the Project Browser looks like after just two users think they both need to load a new double door and type.
Jason's post is focused on cleaning up after oneself and it IS important but it is also important to manage the loading of content and harvested details. It is equally important that people understand why these extra versions show up in the first place. Each time someone uses Load Family or Insert from File they must reconcile the warnings that appear before anyone has a chance to begin using the wrong version of the families that are duplicated.
I think it is worth restating that the subtlety of this issue is that this only happens when more than one user is introducing the same new family to the project (via their Local Files).
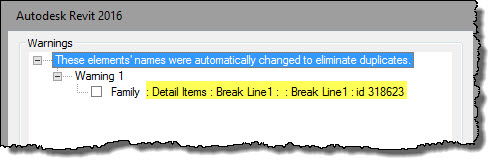
Once the family is part of the project (defined in the Central File) Revit doesn't get confused anymore. Here's what happens when I introduce the Break Line family he mentioned to the project via two users. Keep in mind that there is no Break Line family defined in the Central File at the moment. Each user loads the family, into their Local File, unaware the other user is doing it too. The first person to use SwC is fine but the second user sees this message (I expanded the warning to see the family description).
When the first user uses Reload Latest or SwC they'll both be able to see this in the Project Browser, listed beneath Detail Items.
Subtlety compounded with yet another subtlety...if the family is already defined in the project (Central File) but a new TYPE is loaded by more than one user then we end up with this situation in the Project Browser.
To close and return to what inspired my post, Jason went on to write that they've abandoned using Detail Components in their details because of this issue. Tragic. They (the detail families) aren't the problem; Revit's worksharing behavior and user habits are. I hope he'll revisit that decision.
One of our most notorious examples is the infamous Break Line. Each drafting view we imported had a copy of the break line family. By the time anyone noticed, the project model had “Break Line (1)” through “Break Line (22)”.What he describes is the result of worksharing and multiple users loading the same family in their own local files. Revit sees multiple versions of the same file being loaded from different local files (users) and seeks to protect them by renaming the other versions it encounters. We see this sort of message when it happens.
This error and situation is easy to replicate.
- Two users open local files for the same project
- Each user loads a new family and the same type
- Each uses Synchronize with Central (SwC)
For example, if eight people all introduce the same new family to the project then by the time the last person uses SwC there will be eight versions of this family listed in the Project Browser. This is what the Project Browser looks like after just two users think they both need to load a new double door and type.
Jason's post is focused on cleaning up after oneself and it IS important but it is also important to manage the loading of content and harvested details. It is equally important that people understand why these extra versions show up in the first place. Each time someone uses Load Family or Insert from File they must reconcile the warnings that appear before anyone has a chance to begin using the wrong version of the families that are duplicated.
I think it is worth restating that the subtlety of this issue is that this only happens when more than one user is introducing the same new family to the project (via their Local Files).
Once the family is part of the project (defined in the Central File) Revit doesn't get confused anymore. Here's what happens when I introduce the Break Line family he mentioned to the project via two users. Keep in mind that there is no Break Line family defined in the Central File at the moment. Each user loads the family, into their Local File, unaware the other user is doing it too. The first person to use SwC is fine but the second user sees this message (I expanded the warning to see the family description).
When the first user uses Reload Latest or SwC they'll both be able to see this in the Project Browser, listed beneath Detail Items.
Subtlety compounded with yet another subtlety...if the family is already defined in the project (Central File) but a new TYPE is loaded by more than one user then we end up with this situation in the Project Browser.
How do we avoid this situation?
As soon as we think we need to load a new family or type...STOP.
Who (on our team) is responsible for ensuring the content we need is available to us? There ISN'T any ONE person assigned to this? There should be. All new content should be requested, requests sent to or asked of this person. That person can delegate the task.
The goal is to avoid the situation where more than one user is loading the same new content.
Only ONE person needs to load the family(ies)/type(s) and then use SwC to make it available to everyone else on the team (they use Reload Latest). We are working on the same project after all.
To close and return to what inspired my post, Jason went on to write that they've abandoned using Detail Components in their details because of this issue. Tragic. They (the detail families) aren't the problem; Revit's worksharing behavior and user habits are. I hope he'll revisit that decision.
Labels:
content,
Errors,
Families,
Habits,
Issues,
Management,
Tips,
Troubleshooting,
Warnings,
Worksets,
Worksharing
Wednesday, January 13, 2016
Pre-Selection and Selection Color
I always change the default color that Revit uses for selected elements. I use Red.
The default setting is the same blue that is assigned to Pre-selection. I don't recall when that changed but somewhere in the fog of time it used to be assigned to red. I happen to like the visual confirmation, the difference between what is highlighted and what is selected. To each their own.
If you want to change it too: Application menu (Big R) > Options > Graphics page
The default setting is the same blue that is assigned to Pre-selection. I don't recall when that changed but somewhere in the fog of time it used to be assigned to red. I happen to like the visual confirmation, the difference between what is highlighted and what is selected. To each their own.
If you want to change it too: Application menu (Big R) > Options > Graphics page
Tuesday, January 12, 2016
Revit Version and Build History
Philip and Luke both mentioned this on their blogs so I'm just echoing their mentions of this recent development. Autodesk put together a list of versions and builds going back to Revit 2012.
It's important to keep everyone that works on the same Revit project(s) on the same version/build, perhaps this will help?
It was fun discussing (while talking to a friend on the phone) the version/build/service pack/update naming yesterday, he'd missed the recent Update Release 1 for 2016 R2...damn it gets confusing.
It's important to keep everyone that works on the same Revit project(s) on the same version/build, perhaps this will help?
It was fun discussing (while talking to a friend on the phone) the version/build/service pack/update naming yesterday, he'd missed the recent Update Release 1 for 2016 R2...damn it gets confusing.
Monday, January 11, 2016
View Range Dialog
I hinted at this change when Revit Sunrise became available at the end of last summer. In 2016 R2, when you open the View Range dialog box and click the Show button this version will appear.
It's intended to provide more information about what the settings within View Range mean.
Fwiw, I still think this version would be better for View Range and Ceiling Plans.
It's intended to provide more information about what the settings within View Range mean.
Fwiw, I still think this version would be better for View Range and Ceiling Plans.
Labels:
New Features,
R2,
Revit 2016,
UI,
User Interface,
View Range
Friday, January 08, 2016
Text Box Boundary Quirk
I read a thread at AUGI describing an issue where the Show Border option to create a box surrounding text fails to completely surround the text it contains. First, if you weren't aware of it, each Text type has a type parameter called Show Border.
The Show Border feature worked fine until I used the Underline override to put a line under the NOTES: heading. It also happens if I use any of the other overrides; Bold or Italic.
I created the following video to show what happened.
Seems easy enough to resolve, just use separate text for the heading. Unfortunately I found that Show Border fails to work properly if the text is altered later too. Just adding a new line to the text is enough to confuse the border/box. Sadly this means the concept of Show Border is fatally flawed...
The Show Border feature worked fine until I used the Underline override to put a line under the NOTES: heading. It also happens if I use any of the other overrides; Bold or Italic.
I created the following video to show what happened.
Seems easy enough to resolve, just use separate text for the heading. Unfortunately I found that Show Border fails to work properly if the text is altered later too. Just adding a new line to the text is enough to confuse the border/box. Sadly this means the concept of Show Border is fatally flawed...
Labels:
Box,
Bug,
Editing,
Graphics,
Issues,
Show Border,
text,
Troubleshooting
Thursday, January 07, 2016
Revit MEP System Browser - Systems and Families
When you examine the information in the System Browser there are separate items for Systems and the Families that are related to them.
We can delete a System if necessary via a Right-Click.
Be careful though, you can also delete a family the same way!
We can delete a System if necessary via a Right-Click.
Be careful though, you can also delete a family the same way!
Wednesday, January 06, 2016
Doors and a Sliver of a Room
Following on my post yesterday regarding Doors and Rooms, if you happen to have a room that is NOT at least 14 inches deep you will find that Revit is unwilling to report either its To Room or From Room parameter. If you've been reading this blog a long time you may remember a post I wrote which included a short video that mentions this issue?
A room like pictured below will work because it is 14" deep.
However the room pictured below won't be recognized and the corresponding parameters will be blank, in this case the To Room parameters.
If you are familiar with the Room Calculation Point (I call it RcP) feature it can be used to influence this issue.
Keep in mind it will also negatively affect which room you can regard as the To Room, if not for this door specifically any other doors that need the opposite behavior.
The Room Calculation Point (RcP) feature was added to doors to provide a way to change how the To Room assignment is controlled. Originally the To Room value for a door was (still is without the RcP being enabled) decided based on the side of the wall the door swings in toward.
There are doors which must swing out of a room but still belong to the room they swing from. For example a classroom's door (like shown in the images above) often swings outward to the corridor (often set into an alcove), for exiting requirements usually. However we still think of and document the door as belonging to the classroom, not the corridor.
If the door is placed so that the panel swings into the classroom (using stock doors) then the To Room parameter is assigned to the classroom. If we then flip its orientation so the panel swings out of the classroom the To Room value remains associated with the classroom (check out the post I mention above for a video of this behavior).
The RcP feature changes that behavior to alter the To Room value to follow the flip of the door orientation regardless, which means in my example, and the images above, the To Room value would change to reference the Corridor instead.
May you have sliverless designs...
A room like pictured below will work because it is 14" deep.
However the room pictured below won't be recognized and the corresponding parameters will be blank, in this case the To Room parameters.
If you are familiar with the Room Calculation Point (I call it RcP) feature it can be used to influence this issue.
Keep in mind it will also negatively affect which room you can regard as the To Room, if not for this door specifically any other doors that need the opposite behavior.
The Room Calculation Point (RcP) feature was added to doors to provide a way to change how the To Room assignment is controlled. Originally the To Room value for a door was (still is without the RcP being enabled) decided based on the side of the wall the door swings in toward.
There are doors which must swing out of a room but still belong to the room they swing from. For example a classroom's door (like shown in the images above) often swings outward to the corridor (often set into an alcove), for exiting requirements usually. However we still think of and document the door as belonging to the classroom, not the corridor.
If the door is placed so that the panel swings into the classroom (using stock doors) then the To Room parameter is assigned to the classroom. If we then flip its orientation so the panel swings out of the classroom the To Room value remains associated with the classroom (check out the post I mention above for a video of this behavior).
The RcP feature changes that behavior to alter the To Room value to follow the flip of the door orientation regardless, which means in my example, and the images above, the To Room value would change to reference the Corridor instead.
May you have sliverless designs...
Tuesday, January 05, 2016
Doors and Rooms and Rooms and Doors
In the year 2016 we find Revit is still utterly clueless about the relationship between doors and rooms. We have this quirky documentation habit of using a room's number to derive a door number, not to mention it's room name to define its location in a building. I know they've noticed because each door has a From Room and To Room parameter.
Recently Elon Musk and his SpaceX team sent a rocket to space and returned the first stage to an upright position back on earth. A feat engineers have long dreamed of accomplishing.
Yet after 15 years Revit continues to rely on third party applications to bridge this feature crevasse.
Don't get me started on the Space Naming Utility being a separate application...grumble grumble...
Recently Elon Musk and his SpaceX team sent a rocket to space and returned the first stage to an upright position back on earth. A feat engineers have long dreamed of accomplishing.
Yet after 15 years Revit continues to rely on third party applications to bridge this feature crevasse.
Don't get me started on the Space Naming Utility being a separate application...grumble grumble...
Tuesday, December 22, 2015
Who's Your Daddy? Logical Relationships in Revit MEP
This is an echo of a post from October 2011. I emphasize this concept in every session I do that is focused on Revit MEP and I think it's worth stating again.
Revit MEP elements, like electrical panels and receptacles or HVAC equipment and diffusers, have a Parent - Child relationship. Revit calls this a Logical Relationship. In contrast the physical relationship is described with duct/pipe but there is no equal for electrical systems. It could be with conduit or cable tray but no such relationship exists yet.
The other day we were chatting about this in class and I blurted out "You know, like who's your Daddy?" I was kidding but one of the guys said that it will actually help him remember to start with the "child" part of the relationship. For example, you start with a receptacle and create a power circuit (system), then choose the Daddy, the electrical panel it gets power from. This relationship continues up through the grandparents, great grandparents etc. When everything is assigned correctly you can see this family tree in the System Browser.
So if it helps, when you are creating relationships between elements with Revit MEP, just remember "Who's your Daddy"! START with the child and then assign the Daddy.
Revit MEP elements, like electrical panels and receptacles or HVAC equipment and diffusers, have a Parent - Child relationship. Revit calls this a Logical Relationship. In contrast the physical relationship is described with duct/pipe but there is no equal for electrical systems. It could be with conduit or cable tray but no such relationship exists yet.
The other day we were chatting about this in class and I blurted out "You know, like who's your Daddy?" I was kidding but one of the guys said that it will actually help him remember to start with the "child" part of the relationship. For example, you start with a receptacle and create a power circuit (system), then choose the Daddy, the electrical panel it gets power from. This relationship continues up through the grandparents, great grandparents etc. When everything is assigned correctly you can see this family tree in the System Browser.
So if it helps, when you are creating relationships between elements with Revit MEP, just remember "Who's your Daddy"! START with the child and then assign the Daddy.
Monday, December 21, 2015
Update Releases and Color Fill Background Processing
I was reading recently (in a couple forums) about a problem with background processing and views using Color Fills. Autodesk acknowledged the issue and they've just issued an update for called Revit 2016 R2 Update 1, and there is an Update Release 11 available now for Revit 2015.
In the release notes they reference color fills when closing a document that uses them. That doesn't sound like the issue I read about specifically. Those seemed related to printing views that have a color fill applied but maybe that's a minor difference from the code's perspective. Hopefully this update does resolve the issue they were having. It did seem that users could avoid it (the background processing error) if they were careful to save their project, close Revit and restart it before attempting to print those views.
Download Revit 2016 R2 Update 1
Revit 2016 R2 Update 1 - Release Notes
Download Revit 2015 Update Release 11
Revit 2015 Update Release 11 - Release Notes
If you have Autodesk Application Manager installed, and if you'd like to see if it will let you acquire the updates, you can try a right-click on the icon in the system tray and choose Check Now.
In the release notes they reference color fills when closing a document that uses them. That doesn't sound like the issue I read about specifically. Those seemed related to printing views that have a color fill applied but maybe that's a minor difference from the code's perspective. Hopefully this update does resolve the issue they were having. It did seem that users could avoid it (the background processing error) if they were careful to save their project, close Revit and restart it before attempting to print those views.
Download Revit 2016 R2 Update 1
Revit 2016 R2 Update 1 - Release Notes
Download Revit 2015 Update Release 11
Revit 2015 Update Release 11 - Release Notes
If you have Autodesk Application Manager installed, and if you'd like to see if it will let you acquire the updates, you can try a right-click on the icon in the system tray and choose Check Now.
Sunday, December 13, 2015
Oh Project Browser and Properties Palette Where Art Thou
It is easy to close the Project Browser and Properties Palette, just click the little X in the top right corner of each window.
It is a little less obvious how to restore them. The formal Front Door is via the View ribbon tab > Windows panel > User Interface.
A bit less obvious is the access to Browsers via the right-click context menu, for the Project Browser at least.
I'm sure you noticed that the Properties Palette can be restored via the right-click context menu too.
It is also available on the Modify ribbon tab > Properties panel > Properties.
The Properties Palette also has two keyboard shortcuts: PP and CTRL+1, at least that's true of my configuration (stock install). There isn't one assigned to the Project Browser but we could opt to do that too.
Oh, Revit MEP users can close and open their System Browser with F9 as well as access it in the same way the Project Browser can be (described above).
It is a little less obvious how to restore them. The formal Front Door is via the View ribbon tab > Windows panel > User Interface.
A bit less obvious is the access to Browsers via the right-click context menu, for the Project Browser at least.
I'm sure you noticed that the Properties Palette can be restored via the right-click context menu too.
It is also available on the Modify ribbon tab > Properties panel > Properties.
The Properties Palette also has two keyboard shortcuts: PP and CTRL+1, at least that's true of my configuration (stock install). There isn't one assigned to the Project Browser but we could opt to do that too.
Oh, Revit MEP users can close and open their System Browser with F9 as well as access it in the same way the Project Browser can be (described above).
Saturday, December 12, 2015
Wish - Transfer Project Standards Organization
Whine Mode On
This is a minor thing but there are times I really wish that the Transfer Project Standards list was sorted by Discipline instead of alphabetically. When I want to transfer just electrical settings to another file it is tedious to have to be careful to parse the whole list for related items that start with C, E, D, V and W...
Whine Mode Off
This is a minor thing but there are times I really wish that the Transfer Project Standards list was sorted by Discipline instead of alphabetically. When I want to transfer just electrical settings to another file it is tedious to have to be careful to parse the whole list for related items that start with C, E, D, V and W...
Whine Mode Off
Friday, December 11, 2015
Revit 2016 - Project Address
In past releases the Project Address parameter that is baked into Revit has always required using the Project Information dialog to enter a proper address format. The usual techniques to force a hard return (like CTRL + Enter or CTRL + M) fail to deliver (for me they've never worked).
In 2016 (using R2 now) when I click on the Project Address parameter within a title block family a special dialog appears to add/edit the information, much more bettererer.
Tuesday, December 08, 2015
Feature Request - Tell me Link Files Have Changed
Working with a group of people today several echoed a request I've heard quite a few times over the years. They'd like Revit to let us know when a linked file (Revit/DWG) has changed so they know to use Reload to see the changes. The precedent for this idea is...yeah AutoCAD.
I suspect that it might negatively affect the user experience when Revit pauses to check for changes, assuming it can't be done as a background process (or multi-threaded). In that case I'd prefer Revit stay nimble and leave it up to me to decide when to check for changes. If it could be done without harming performance then I'd welcome it too.
Something for under the Xmas tree...
I suspect that it might negatively affect the user experience when Revit pauses to check for changes, assuming it can't be done as a background process (or multi-threaded). In that case I'd prefer Revit stay nimble and leave it up to me to decide when to check for changes. If it could be done without harming performance then I'd welcome it too.
Something for under the Xmas tree...
Friday, December 04, 2015
Stretching Schedule Properties Dialog
When we stretch the schedule properties dialog only the Available Fields list gets wider. The side dedicated to the parameters assigned to the schedule gets no love.
It's been this way for quite awhile but it still seems strange to me...
Thursday, December 03, 2015
Insert Data Row is Disabled
While working in a Room Schedule we can create new rooms via Insert Data Row versus placing a room in the model and having it appear in the schedule. This allows us to assemble a project's programming requirements early or at least at the same time as modeling activities are creating the building. There are two settings that will disable the Insert Data Row tool (using Revit 2016 at the moment). This is what it should look like.
If we don't check the Itemize every instance option on the Sorting/Grouping tab the Insert Data Row is disabled.
The other culprit is using the Embedded Schedule feature.
Careful out there...
If we don't check the Itemize every instance option on the Sorting/Grouping tab the Insert Data Row is disabled.
The other culprit is using the Embedded Schedule feature.
Careful out there...
Subscribe to:
Posts (Atom)