Tuesday, January 16, 2007

White Pawn takes Black Knight

Recent newsgroup question, "How do I get white text over a black background?" Like this:


Here's how:


Use a filled region to create the black background then edit your text/labels.
[True for 2009 and previous]
Color: White
Background: Opaque.

Amended for for 2010
Color: RGB 251,251,251 (nearly white, RGB 254,254,254 is displayed "black")
Background: Transparent

That's it!

Caution if you export sheet views to dwg you'll need to adjust your pen table to plot the text correctly. If you assign the text on the titleblock to its own layer you can tell AutoCAD to plot them using the object color so the text will plot over the background hatch. There are probably other options as well.

Saturday, January 13, 2007

Fillet This! - The Options Bar

In the "if t'were a snake itta bit ya" category the Options Bar appears often. The question asked, "Can I copy something multiple times?"...the answer, "the Options Bar".
Another, "Can I copy something when I rotate it?"...the answer...you get the idea.
The subject of this post is, "Where is the fillet command?" The answer..."the Options Bar, sort of". Trouble is that most everyone seems to think that the fillet command is an editing task. All those years in other software told em so!

Along comes Revit and they seem to view it as a creation tool. A fillet is creating a third element, a line or wall arc where nothing was before except two lines or walls meeting at a corner or maybe not even meeting. With this in mind the process to fillet between two walls or lines is a creation event and the command is hiding within the commands for both, wall or lines.

When you are sketching a wall/line you have to take a closer look at the options bar because there is a little innocent check box next to Fillet and a place to enter a radius value. Check it, enter a value and when you sketch you'll get an arc between the segments you draw. Like this box:


Now what if you have a box already and you really meant to have radius corners? Start the wall/line command again and this time take another look at the Options Bar. Click the little pull down arrow next to the sketch tools and look at the list offered. Choose the Fillet Arc option.


Now you can select the two walls/lines you want to fillet between and graphically decide where the arc should land or specify a radius on the Options Bar first.
When in doubt, take a good look at the Options Bar!

When is Revit...Not?

I stumbled across this interesting REVIT website this morning. Here is the text from their about page:

Within North-West Europe six partners have come together to improve regenerating their brownfield sites by sharing experience and developing new concepts and innovative approaches.

Revitalisation of brownfields
In every country and in almost every city of North-West Europe (NWE), there are brownfield areas that need to be revitalised in order to preserve or improve the quality of urban living conditions. The revitalisation of brownfields may enhance coherent urban development, but can also create new employment and stimulate the local economy. Ultimately revitalising brownfields for a variety of future utilisation preserves new building land and makes cities aware of that value.

Six partner areas
The approaches to regenerate brownfield sites in North-West Europe are manifold and differ due to the specific national legislation and administrative instruments or the local economic situation in the different partners' areas.
Nevertheless, the six partner areas involved in the REVIT project confront problems in the context of brownfield regeneration that are in essence very similar and need to be tackled more effectively by improved co-operation within the NWE region.

New approaches
Until August 2007 the transnational working teams will develop new approaches for different aspects of brownfield regeneration. To ensure the practical realisability of the new approaches the teams will be testing the new tools in each partner area before publishing final guidelines and recommendations.


Good thing I didn't try to attend the conference they held back in 2004, titled "Revit Conference". Would have been surprised they weren't talking at all about the software!

Friday, January 12, 2007

Fixed "Map" Grid Overlay

Got a call from a friend today describing a situation he was sorting through. He needs a gridwork to overlay on his project that defines the project much like a map defines each grid cell by the letter on the vertical and horizontal borders. Just like the National Cadd Standard Uniform Drawing System (NCS/UDS) suggests for our sheets. In this case the project is so large that they want this grid to help find parts of the project. So this grid needs to appear in all views possible automatically.

The obvious issue with just using Revit grids in the project itself is that they compete with "real" grids for structural steel etc. The answer? We came up with nesting a separate Revit project with the grid layout. Guess we'll see how well it works as it goes forward. The grid below is a mockup and each square is 150 ft. x 150 ft.


The catch? Since you probably want grid cell labels you need to set up a view for each scale so you can add some text in between each grid. So for each scale view that you need to see the grid in the host project, you create a view and annotation for it. Then in the host file you override the visibility graphics for each view to assign the correct scale view.

Wednesday, January 10, 2007

Revit User's Residential Example Project - Diary

Robert A. van het Hof, Assoc. AIA created this SITE as an example for a computer user group that was discussing 3D modelling software. Let him know what you think. He says on the site that it is a temporary web site so I don't know how long it will exist, check it out! Here's one of the images he posted:

Tuesday, January 09, 2007

Egress Re-gress

I've enhanced the earlier example by adding annotation symbols "Dot" and "Arrow" to the Egress family: Path of Travel. There are three types within, Start Middle and End. She looks like this now...you could do the same...

Monday, January 08, 2007

Viva la "BIM Revolution"!

A new blog surfaced in October 2006 called BIM Revolution. Created by Mark Hulme a Job Captain at Flewelling & Moody, an architecture firm in Pasadena, CA. His mission:

This blog has been created to detail the planning of and promote the Pasadena & Foothill Chapter of the AIA's 2007 Technology Symposium: BIM (r)Evolution: The Path In.

The site is also intended to become a repository of BIM information and resources as they become available, filtered by and for architects. Welcome, and thanks for joining us.

Keep an eye on it to see what develops!

Saturday, January 06, 2007

Four BIM

A new site called 4BIM will debut in the Spring of 2007 but there is page there now. Miles Walker is the editor of 4BIM and he is the CAD Manager and BIM and buildingSMART specialist for HOK International in London (and clever guy, my words).

Egress Path

[added Nov 22, 2011] I've written quite a few times about this now, more than ten times. A quick search of this blog for the criteris "Egress" will yield links to all the posts. If you just want to download examples you CAN HERE.

Often my articles are inspired by something I read on the newsgroups or forums. Other times they come from client questions. In this case it came from both and when line based families were introduced I applied them to this question, “How can I describe and then document exiting paths?” I discussed this approach at Autodesk University 2006 and the files will be available at AU Online.

This first image is the plan representation of the line-based family I made:


This image is the schedule results after sketching the segments you see above:


This image is what the family looks like in a 3D view:


I used a sub-category of generic model to allow me to turn on/off the 3D guy that’s sliding along the egress path.

This is an image of the family itself:


It is a line-based solid sweep using a silly looking “human” like form as the 3D object. A symbolic line in plan sweeps along with it. Finally a Multi-Category Tag family reports the “length” parameter (yes, a shared parameter) of each segment in the plan view. A multi-category schedule filters for just elements that have an egress related comment.


The trick to getting the Path of Egress shared parameter to report the length of the line-based family is to connect it to the default Length parameter present in line-based families already. Just entering the parameter name “Length” in the formula column for the parameter “Path of Egress” connects them.


I suppose I should have made a girl version too? Modular man? Give it try, see if the concept works for your needs?

Refer to the email instructions on the sidebar if you want to get a copy of the project file, which will give you the family, tag and the schedule as well as what you see above naturally.

Thursday, January 04, 2007

Easy RGB - Paint Color RGB Values

A fellow Revit user, C. Ryan, posted a link to Easy RGB at the Autodesk Newsgroups and I thought it was something I ought to do too. Looks useful for those of you doing rendering/color matching, among other things?

Wednesday, January 03, 2007

Which Objects Cut?

So how do you know which objects Revit will cut? Well you could look in the help files and read the chart.

Help File Location:


Chart:

Or you could just open Settings menu > Object Styles and gaze upon the list of categories. Any element category with a gray box underneath the CUT column...well...doesn't.


Fwiw this image of the object styles was captured using the Scrolling Region function of SnagIT. This makes it easier to capture the information that isn't possible to report in Revit any other way.

Saturday, December 30, 2006

Notes to User - Family Editor

Would you like to put a note in your families that is just "read only" when used in the project only, like this perhaps?


Here's how:

Create the parameter
Use "Text" for the data type
Enter the value you want stored as text in the formula column
(Just make sure you wrap it with "quotation marks")

Like this:


If using nested families just make sure you do this in the final host family so you can still "touch" the parameter to connect it to its mate in the host.

Hope this helps!

Friday, December 22, 2006

New Build for Revit Building (20061202_0700)

From the Autodesk site:

This build, (20061202_0700), addresses several support requests concerning revit-based release 9.1 project files.

Support requests related to the following areas have been addressed:

Export of projects with linked RVT files to the 3D DWF™ file format
Occasional corruptions within default template files
“Cannot load element” messages preventing the ability to Save To Central
Behavior of dimension witness lines for cropped objects
Visual fidelity of objects when printing files with linked files
Door swings from linked RVT files that would not vector print or export
Selecting of level annotations
Anomalies invoked by exceeding maximum array size
Loading of families into local files

DOWNLOAD

Thursday, December 21, 2006

Workplane Visibility Tips

Two subtle tips for those who like work with the workplane grid visible. If you do use it often you probably already know them?

First when you rotate the grid you'll find that the rectangle sketching option will be constrained to align with the grid. Also it will be easier to sketch and align to the angle of the grid.

Second if you are zoomed in on the grid, how do you select it? Zoom out so you can select the edge? Well you don't have to. Two ways:

One: click Tools menu > Select Work Plane Grid


Two: Click Workplane button > Click OK (selects the grid as a result)


Cadplan enters Phase "Beta" with Content Highway

As David announced on his Revit Beginner's blog , Marek Brandstatter announced that their Revit content application called Content Highway is now available as a beta release. Check it out and let them and us know what you think.

Italian Revit Blog

This blog, Progettare in ambiente BIM is the latest I've found out about on the international Revit scene. Check it out!

Options Bar Data Entry

When I use the Offset tool I find that I must take care when I enter a specific ofset value if I want to use the Tab key to select "A chain of Walls or Lines". I get similar result when I use the Pick Lines option while drawing walls or lines.

The issue seems to be one of focus, Window's focus. That is what programmers refer to when a text box or similar control has the applications attention. When the offset value text box on the options bar has focus, Windows thinks the Tab key should be advancing to another control on the interface. In this case it advances to the Numerical radio button. I have to click in empty space in the drawing window to get the Tab key to do what I want. This put the focus back in the drawing window and Revit gets to define what the Tab key will do.

So watch out for this in your workflow.

Wednesday, December 20, 2006

Patience is a Virtue

Yeah, tell that to me when I'm waiting for Revit to open up the first time. Another usual gotcha I run into in a class setting is trying to open Revit several times when you become convinced that Revit is not loading after you double clicked the Icon on your desktop.

When you double click the icon you get a little hour glass for a few seconds and then, poof!...nothing, no hint of Revit loading and you start thinking, "Did I really double click or was it a single click" and "Did I see an hour glass or did I imagine it?" So you double click it again and suddenly Revit appears again and shortly afterward another session appears and, if you aren't a lucky sort, so does an error about licensing.

This can be lots of fun when a classroom of 12 opens up Revit before I get a chance to warn them. One poor soul tried to open Revit twelve times before I interupted his efforts. At least the other eleven sessions opened up pretty quickly after the first....

So the moral of the story really is patience IS a virtue AND that hopefully Revit will get better at telling Windows what it is up to so we don't start to doubt ourselves!

Space Bar Gotcha - Visibility Graphics

[note: in 2009 versions I don't experience this issue, though it is still technically possible - Steve 09/2008]

I run into this every now and again. Revit user complains that all the model objects are off in a view or all the annotation...or imported files. They've tried all the usual suspects like Visibility/Graphics, Worksets, Phase/Phase Filters, Filters, Design Options and so on. They just didn't notice that every category in the Visibility/Graphics dialog (under one of the tabs) was gray and not selectable.

The question is how did it happen, surely it wasn't done purposely. Enter the good old Space Bar, pun intended. AutoCAD/ADT users are so used to tapping the space bar to start a command that they are hardly aware that they are still tapping it from time to time in Revit, that and Revit uses it for flipping or rotating some objects.

The trouble is that opening the Visibility Graphics dialog and immediately hitting the space bar unchecks the top most check box next to: "Show (Model,Annotation,Imported) Categories in this view". G That's what Windows assigns to the Space Bar for keyboard behavior when Window's focus is on a check box.

Before:

After:


So don't let the Space Bar getcha!

Revit JOBS

I've added another blog called Revit JOBS. I mentioned this in an earlier post about HNTB looking for Revit talent. I've purchased the domain www.revitjobs.com so that will take you to the blog site directly now. There are just two posts there at this time. Hopefully it will prove useful!

Tuesday, December 19, 2006

AUGI Board of Directors

I've just been informed that my bid to become a member of AUGI's Board of Directors was successful. Voting began on November 28 at Autodesk Univerity and closed on December 15th. My new role with AUGI begins at the beginning of the new year and has a two year term.

I'm looking forward to being part of the leadership of AUGI and hope to make positive contributions that will benefit all AUGI members and naturally with my "Revit bias" I hope to continue to improve the experience for our Revit community at AUGI as well!

Wish me Luck!!

Wednesday, December 13, 2006

HNTB WANTS YOU!

Reminiscent of the old "Uncle Sam wants YOU!" signs??

HNTB Architecture is looking for a National CADD Manager. With an initial primary focus on ADT support and training there will be a gradual transition over to BIM. Ideally based at the home office in Kansas City, the right candidate may be in a position to work out of their LA, DC or NYC offices.

If you are interested? You can send an email to pdavis at hntb dot com

[fix the at and dot accordingly 8-)]

Tell em Steve sent you... As of tonight I'll be posting any jobs I learn of or requests to find a job at Revit JOBS. This is a brand new blog space for this purpose, let's see if it proves useful?

RTC 06

Otherwise known as Revit Technology Conference 2006. Better late than never?

I left Los Angeles on October 23rd, Monday night, at 10:30 PM and arrived in Sydney on Wednesday morning at 6:00 AM. I lost one whole day in the process due to the magic of time zones. Much to my surprise I was quite refreshed after my 14.5 hour flight on a Qantas 747/400. The Qantas flight crews were the picture of efficiency right down the instructions to “do up” our seatbelts. I love the way folks outside the USA say things!

The event organizer was and is Wesley Benn, the owner, proprietor, chief cook and bottle washer for Benn Design. Here’s a shot of Wesley.


Wesley was kind enough to rise early enough to give me a lift from the airport and take a little driving tour of Sydney which included walking around the Sydney Opera House. It was unfortunate that I couldn’t get inside. I also realized that I didn’t bring a camera AGAIN! I seem to lack the gene that causes people to photograph things that happen in their life. If it weren’t for other families who do have this gene there would be no record of our children doing anything!

We visited his old office where he “made” me help him move a copier, remove some paint cans and do a little demolition on his signage. We then went to his new office where he again put me to work packing up computers for the labs, teach a couple clients Revit and well…not that last part. Car packed full of stuff we headed for the conference site, but for the brief stop to put some helium in one of his tyres. I had no idea that it is fairly common practice to put helium in tyres instead of air. It is apparently a very stable gas to use and much more reliable than air. (notice my Austrylian spelling of tires?)

The venue was the Shoal Bay Resort and Spa, which is located on the white sands of Shoal Bay in Port Stephens, New South Wales, Australia. You can review the conference schedule and the speaker biographies.

When I first started discussing attending this conference with Wesley we thought it would make sense to teach a class. One class became two, the first a family lecture and the second a mini session on massing. Since I was preparing a lecture for Autodesk University 2006 on the subject of Families anyway it made sense to preview or test or demo it on a smaller crowd very very far away right? Good thing too, because my ninety minute session ran forty five minutes over…with permission mind you…I gave them a chance to “run away”. Good thing we were only going to dinner and open bar afterward. Here’s a shot of me doing what I do best…blah blah blah…. And my power point humor 8-)


As conferences go it was very busy, yet very relaxed and a lot of fun with as much effort applied to making time for mingling. I did learn that even though Foster’s is "Austrylian" for beeear, Victoria Bitter and Tooey’s gets poured a LOT more!

One of the highlights of the conference for me was getting to finally meet my friend Bruce Gow in person, who is probably more widely known by his AUGI Revit forum moniker “BeeGee”. We’ve been friends from afar ever since getting to know each other via the internet and the old Zoogdesign Revit forum. It was nice get to sit and talk face to face!! Here’s a couple pictures of Bruce, one where he’s inspecting the inside of his eyelids or maybe he’s just blinking?? You decide…


Apparently after this first picture he figured out how to always stay with his back to the camera?


Here’s a parting shot of the conference attendees! Try to put aside a week and travel down under next time!!


It would be unfair to exclude the contributions of Marina Radosevic and Helen Benn for their tireless effort to organize everything. Also deserving of recognition for their hard work is the remaining leadership of the Revit Users Group Sydney. They are (Treasurer) Michael Juda, (Secretary) Adrian Esdaile, Rocco Raso and Toby Maple.

Okay one more…just what every Revit party needs! A circus performer trying to set himself on fire!

Monday, December 11, 2006

Write a Book…part deux

In my previous post regarding the book I left out two key pieces of information. First the book will be a comprehensive guide to using Revit. The title remains undefined at this time for a variety of reasons.

Second and most important, I am teaming up with my friend and Revit collegue, Bruce Gow. You may be more familiar with his moniker in the AUGI Revit forums, “BeeGee”. As a Revit trainer, consultant and practicing architect in Australia he will provide technical editing as well as be a contributing author. I'm enjoying working with him on this project.

As soon as Wiley/Sybex is able to prepare some preliminary information for posting at Amazon and on their own site it will be possible to pre-order the book.

There is another book underway now that is already listed on the Amazon site HERE or HERE that you might find interesting as well. Recognize the authors? These books are meant to compliment each other.

For those of you who have commented here and written to me, thank you for the kind words.

Tuesday, December 05, 2006

"You Should Write a Book"...

Hello and thank you for your patience!!! I've been so busy that this blog has taken a back seat unfortunately. So what has managed to distract me?

First of all I attended the Revit Technology Conference in Sydney Australia the last week of October. I presented two topics, Family Editor and Massing. The trip was too short but a lot of fun and my friend and host Wesley Benn never ceases to amaze me. More info on this event in a future post.

Second, Autodesk University which just wrapped up this past Friday. I presented three sessions as I mentioned in an earlier blog post. More on this in a future post or two.

Third and the point of this post...during the last few years I've been told, "Steve, you should write a book". The folks at Wiley/Sybex thought so too, so I signed on the dotted line. I'll post a link to the pre-order page at Amazon in the near future. I'll post about my progress and sorry, no promises about actual release date, ha ha, just like software!!

Thursday, October 19, 2006

New Builds for Revit 20060928_2300

A new build for Revit Building was posted on Friday night. The following information is from the Revit Building download page:

This build, (20006_0928_2300), addresses several upgrade issues discovered in Revit-based release 9.1 project files.

Issues related to the following areas have been addressed:

File inconsistencies stemming from the upgrade process
Behavior of Rooms with Plan regions
Improvements in snap to DWG
Filtering as it relates to the Save-to-Central function
Unexpected behavior when using the spacebar
Placing revision tables inside of titleblock families issue
Irregularities within the Keynote function
Inconsistencies when upgrading template
Issues with portable license utility

Download Link:

Revit Building

Tuesday, October 17, 2006

New BIM Blog!

Nothing like other bloggers to make you feel inadequate! Robin and David and Sean...as far as I know have already mentioned this new BIM blog
(bim)X by Laura Handler of Tocci Building Corporation.

While only having started blogging in September this year, Laura has already written many interesting articles. I appreciate that she is sharing the things they are doing, learning and hoping to accomplish. The insight into how Revit supports their needs (or doesn't) is very helpful! Cheers!

Monday, October 16, 2006

Autodesk University 2006

I apologize, I am late mentioning this. I have been selected to be a speaker at this years Autodesk University 2006, held in Las Vegas at the Venetian Resort Hotel Casino (November 28th thru December 1st). The Autodesk University planning team has a difficult task choosing from a great many submissions from highly qualified people. I am flattered and honored to be selected again. If you are interested in the perspective of one such planner you can visit Joseph Wurcher's blog.

I am presenting two classes, repeating one for a total of three sessions:
November 29th at 3:00 PM (90 Minutes)
Powering Up Your Autodesk Revit Families (Lecture Format)

November 29th at 5:00 PM and November 30th at 8:00 AM (90 minutes each)
Autodesk Revit Building Family Editor Basics and More (Lab Format).

The "Powering Up" session is part of a new feature this year, the Revit Power Track. Thirteen sessions are following a theme and related project. The goal is to provide intermediate to advanced level information to attendees craving the "how", now that they know "what" is possible.

The lab sessions are going to focus on reverse engineering examples of some cool content to discuss how and why things were done as well as covering the basics. We'll have a few special guests as well so we should have some fun!

The bad news is the labs are full as of right now. In fact the response to this year's AU and the Revit Power Track sessions has been nothing short of phenomenal. Read Joseph's blog for more data on this.

For those of you already registered, I look forward to meeting as many of you as possible. For those who have not, check out AU 2006, it might not be too late for you!

Wednesday, October 11, 2006

Oops! I Deleted the Titleblock! Now What?

When you create a Sheet View Revit adds a titleblock to the view. What if you delete it and don't realize it till later. How do you put it back? How can you just put a Titleblock on an existing Sheet View? There is no command...Symbol? No... Component? No... Tag? No... Guess you can't?

Here's two options, best one first:

Use Edit menu > Copy to Clipboard to copy a titleblock from another Sheet view

Use Edit > Paste Aligned > Current View to paste the titleblock into the Sheet View that is missing the Titleblock. (Also can use Edit > Paste Aligned > Select Views by Name if you managed to delete more than one)

You can drag a Titleblock from the Project Browser (found under Annotation Symbols category) onto the Sheet View. Take care that you won't be able to position this titleblock in the exact location the previous one was. That's why the first option is better.

Tuesday, October 03, 2006

But I Didn't Do Anything?!? Yes You DID!

Every so often someone will open a project using worksharing, poke around a bit and unwittingly end up borrowing something. Typically a view, plot settings or sheet view perhaps. When they choose File > Close Revit will "yell" at them, telling them they should Save to Central, but they don't because they didn't "do" anything. A little later someone else needs that view or plot setting and they find that this innocent person owns it or them.

What went wrong? First of all the innocent person didn't fully appreciate how their incidental interaction with Revit ended up borrowing something. Then they compounded the problem by not reacting correctly to the warning Revit offered.

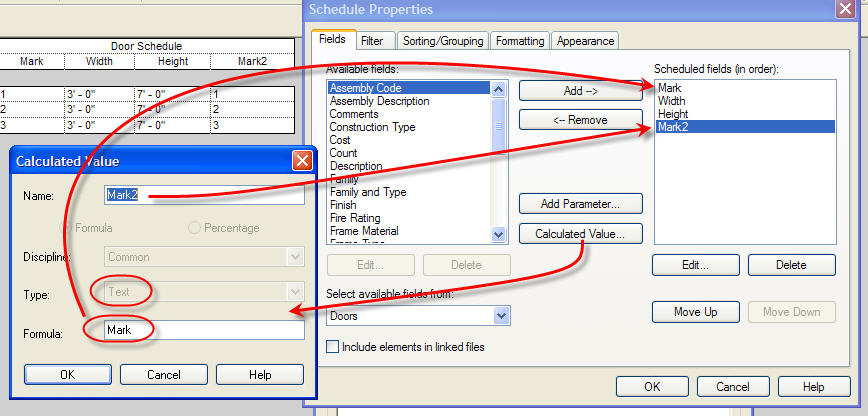
Take a view for example, we can look at the model through any view we want all day long without borrowing a view. As soon as we alter the scale, change Model Graphics Style from hidden line to Shading with Edges or turn on an underlay Revit lent us the view. In other words, any change to the properties of the view itself requires Revit to lend it to us.

Similarly if we change a plot setting to use a different sheet to just plot part of a view we are borrowing a plot setting to do so. Seems innocent enough but in reality Revit must manage these things and prevent simultaneous ownership of elements and access to their settings.

How do you get around this?

First of all consider using Detach From Central if you really intend to just poke around and not contribute new work or editorial effort to the actual project.

Second, understand that wandering around the project file is not necessarily the innocent activity it might seem to be.

Third, heed the warnings that Revit gives you. If it says you should Save to Central, you should!

If you are determined not to save any changes you made either intentionally or not then follow these steps.

Step 1: Choose File > Close - When Revit warns you to STC
Step 2: Choose Don't Relinquish - this means you still own things

Step 3: Choose NO - When Revit asks if you want to save your 
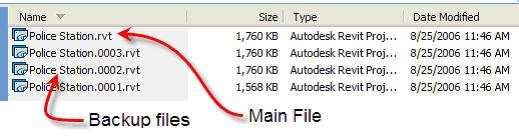
Local File

Step 4: Choose File > Open - Select your local file again
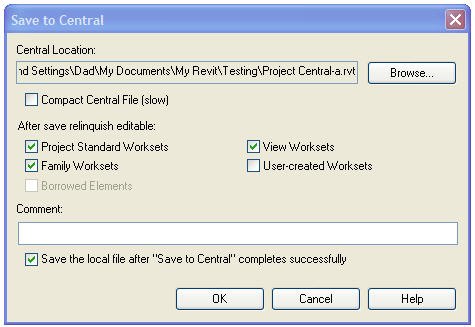
Step 5: File > STC - Relinquish all worksets (this way you'll return everything you borrow previously, without saving any changes)

Alternatively this last step you should be able to use Relinquish All Mine as well.

Relinquish All Mine will work without the above process when you haven't changed any elements at all. Let's say you only borrow a bunch of walls and doors but don't actually change anything about them. You didn't reposition something, change a property...JUST borrowed them. Then Relinquish All Mine will work. Otherwise you'll need to follow the steps above.

May all your worksets be editable!

Thursday, September 28, 2006

Autodesk Revit Building and Paul Aubin

MicroCAD in Boston is hosting an all day Revit seminar featuring Paul Aubin, the author of Mastering Autodesk Revit Building. Here are the details that I have.

Excepts from pdf announcment:

When:
Tuesday, October 17, 2006,
Double Tree Guest Suites, 400 Soldiers Field Road, Boston.

Morning Session:
Revit Building – Family Editor Intro
Detailing in Revit Building

Afternoon Session:
Revit Building – Family Editor Advanced
Design Options in Revit Building

Cost:
Half day sessions $159
Full day $299
Full day with book $349

REGISTER TODAY! Call 888-923 2279, if you get the form you can fax it in to register and it looks like you can REGISTER HERE.

Wednesday, September 27, 2006

Freeform Roof via WikiHow

James Vandezande, with SOM, has shared how to use a freeform roof made in software other than Revit (Rhino) and then use it in Revit. He's shared how on WikiHow. Take a look! Thanks James! (note: I believe this was part of his Autodesk University lecture last year)

Tuesday, September 26, 2006

LA BIM Workshop featuring Autodesk Revit & Phil Read

For those of you in Southern California this event will be on October 19th. Space is limited to the first 100 so don't hesitate.

Here is an excerpt from the LA CAD flyer:

"L.A. CAD is pleased to offer a unique, local, learning opportunity for Revit users and those considering implementing Building Information Modeling (BIM) in their firm, by bringing Phil Read to Southern California for a one-day workshop to help you achieve more."

Class List:

Session 1 Preliminary Design Techniques in Autodesk® Revit®
Session 2 Large Project Management in Autodesk® Revit®
Session 3 Autodesk® Revit® for Business Managers, Project Managers, CAD Managers

Details:

WHEN: Thursday, October 19, 2006
9:00 am to 3:00 pm

WHERE: Holiday Inn LAX
9901 La Cienega Blvd.
Los Angeles, CA 90045

AGENDA: 8:30 – 9:00 Registration
9:00 – 10:30 Session 1
10:30 – 11:00 Break
11:00 – 12:30 Session 2
12:30 – 1:30 Hosted Lunch
1:30 – 3:00 Session 3

TUITION: $50 per person for the day, includes lunch

TO REGISTER: Call Mayra Jaime at 877-875-2223 x 273, e-mail her at Mayra.jaime@lacad.com or visit LACAD
AIA CREDITS: AIA is offering 2 Learning Units for attendance

Thursday, September 21, 2006

No Periods, Period!

If you used Periods in your file names AND numbers you are asking for trouble.

Here are three examples:
Project.0921.rvt
Project-Central.454.rvt
Project-Steve.0921.rvt

When you save a file named this way you'll get this error message:


Just don't use periods. She'll be right mate!

Tuesday, September 19, 2006

Repeat a Column

Yonks ago I wrote a post at AUGI lamenting the inability to repeat a column in a schedule. I shared my workaround which involved a second schedule showing just mark and then aligning the schedules, ouch!

Then the Revit team quietly enhanced schedules. Time passed and I never revisited the question. Well you CAN repeat a column, let's choose the Mark value for a door since that's what I wanted back then.

When you create a schedule you have the option to use the Calculated Value feature to create data. In this case we'll use it to make a second Mark parameter called "Mark2". Then we'll assign the data type: Text and then enter Mark for the formula which means it is equal to the Mark parameter already in our schedule.

Take a look at the image. The resulting little schedule in the upper left corner shows the second column and the other dialogs show how we got there.


Just make sure the data type of the Calculated Value is the same as the value you want to repeat.

Happy repeating columns!

(Note: This didn't become possible until Revit Building 9.0 was released)

Tuesday, September 12, 2006

Do You Have A Pioneering Spirit?

Wimberly Allison Tong & Goo is looking for talent, Revit talent Sir! Here are a couple links to the information you'll need to contact them. With offices in Orlando, Seattle, Honolulu, Irvine, London and Singapore....may 5 Star resorts be in your future!

WATG website Careers

WATG AD Image

Monday, September 11, 2006

Unsung Feature in 9.1

No mention of this in "What's New".

In past releases grids and levels cared whether you sketched them "right to left" or "left to right". What? Okay...when you drag a grid or level to change its extents Revit will drag all the other grids or levels along with it automatically as long as they have the same "head" and "tail" orientation.

In 9.1 they don't anymore. They align and behave together regardless of which way you sketched them. Thanks!! I like it!!

Friday, September 08, 2006

What's to Love about Revit Building 9.1?

There are no stunning features in 9.1 and that's because it is an alignment release. This means that they are focused on making sure the Revit platform (all three versions) is coordinated well. Naturally improving overall performance and scalability is an ongoing task but unfortunately they are features that only a programmer's mother could love and appreciate 8-).

They also try very hard to tuck in other improvements that don't require as much development time/resources as those that ultimately appear in full "point oh" releases, like the next version Revit Building 10.0, release date tba.

Some of the things we really want Revit to do require considerable effort and even revisiting some of the decisions that were made several years ago. As anyone who has revisited design decisions on projects that take several years to develop can attest, this can be a daunting task. Now where did I put that drawing...?

So what do I really like this time out? I really appreciate the subtle parameter added to elevation view's, "Hide at scales coarser than". The same parameter that Sections have, this means you can specify an elevation's annotation should not appear in a scale that is coarser than the one you place it in or some other scale you choose. This will go part way to making it easier to manage these buggers in our projects. Still a way to go to make them really sing but a nice touch, THANKS!

A few more to keep this post short...

Units can be defined when exporting to dwg. For those working with the metric system it proved somewhat bothersome to find that the unit assigned was millimeter and that you now had to change it after exporting. Now you can specify it before hand. Muy Bueno, no?

Section lines are now better able to snap to non-orthogonal walls. Again a subtle but appreciated touch.

Now you can tell Columns that they are room bounding before you place them.

Revision clouds and their tags can now display separately as is the norm in many firms. As is their habit, once a new revision is made earlier clouds are turned off and the little delta tags remain. Until this release you couldn't keep the tags without the clouds, aaah...much better now.

Last one for now...filled regions have an area parameter. This permits you to sketch a filled region arbitrarily, in a view, and find out the area of the filled region by looking at its properties dialog. Since this is meant as a "throwaway" value it is not possible to schedule or tag, both of which would be nice to be able to do. Still...some users are wishing for a simple "pick based" area command like that of AutoCAD.

Stand Alone? Central File? How Can I Tell?

When you are looking in a project folder on a server how can you tell whether you are looking at a standalone Revit project or a Central and Local File set up for Revit Worksharing? Let's look at a standalone project first.

Revit's default setting is to allow three (3) backup files. Each time the file is saved Revit will cycle through these three backup files, unless you specify more or fewer backups. The project team and/or IT should/will determine how many there should be.

Now take a look at the project after it is converted into a Central File when worksharing is enabled.

Notice the naming convention used? Project name with a suffix of "- Central". This makes it more obvious that you are looking at a Central file. When you make a local file change the name of the copy by removing "- central" and putting your login name and today's month/day just to make it distinctly different. Such as: "Police Station - sstafford09/08.rvt"

Also notice the matching folder with the suffix "_backup". Revit adds this folder during the process of creating the Central file automatically. Pretend this folder has some really "smelly" stuff in there and just stay out. Just like those stickers you see on electronic equipment that say something like: "Warning no user serviceable parts inside - cutting this tape will void the warranty" there are no user serviceable files in this folder.

Revit's default worksharing setting is twenty (20) backups. Consider four team members may STC (Save to Central) five (5) times per day. This means there will be a discrete backup file for each time the file was saved during the day, up to twenty times. If more saves occur then Revit will cycle through the twenty backups, overwriting the oldest first.

(Edit: 9/12/06) Just to clarify, when Cad Digest picked up this article and posted a link with a summary it implies that Revit automatically adds the "-Central" to a Revit central file. It does NOT. That was added by ME when I did a SaveAS prior to enabling worksharing.

Friday, September 01, 2006

New Versions: Revit Building and Revit Structure

Revit Building 9.1 and Revit Structure 4 are now shipping. I waited to post this article until the Revit Building web downloads were posted. Revit Structure is still not posted, will post a link when it becomes available.

This release of Revit Building is best described as an "alignment" release whose focus is less on major features than fixing issues, performance and coordinating the behavior of all versions of Revit. People who are "wishlist" watching won't find a lot to be thrilled about for this reason. We will have to wait for the next full release for the next round of major improvements and/or features.

I'm am pleased with the subtle improvement to Elevations however. The addition of the wordy parameter "Hide at Scales Coarser Than" means we now have a level of control over the visibilty of these buggers that is long overdue. Here's hoping we get the rest next time!

Download Revit Building 9.1 HERE and just READ about it. (remember you have to choose your language, then you can select version (RB9.1 or RBS9.1) which to download.

Wednesday, August 23, 2006

Autodesk Revit Building Customer Council

Autodesk has established a new way to communicate with them regarding the development of Revit. Similar to the approach taken for Autodesk Architectural Desktop in the recent past Autodesk has partnered with Walker Inc (Marketing Firm)to create the Autodesk Revit Building Customer Council.

By joining you are expressing a willingness to take part in surveys sent out to members once a month to help guide the development of Revit. If interested be sure to read through the various links that explain how it works and what to expect. If you are still interested, then join!! Then vote and vote often!

Tuesday, August 22, 2006

Revit and Spanish

There is now a blog available to those who speak Spanish! Guillermo Melantoni, in Argentina, started his blog Revit Latino recently. Check it out!!

Revit and Spanish - Part Dos

Right on the heels of mentioning Revit Latino another Spanish language Revit blog comes to my attention. Revit-MBA is provided by the firm Montealegre Beach Arquitectos (MBA) in Santiago, Chile. They have been posting articles beginning in May 2006. Check them out!

Wednesday, August 16, 2006

Making New Sheets

Did you know that you can copy a sheet to clipboard and paste a new sheet into the project browser? Now you DO!

Add a new sheet, rename and number it (or use an existing sheet). In the Project Browser select the sheet and press CTRL + C (Window's copy to clipboard shortcut). Then immediately press CTRL + V (Window's paste from clipboard shortcut). The new view is added and renumbered based on the next number using the previous and using the same name as the previous as well, as fast as Emeril can say "BAMM".

For what it is worth when you select a sheet and Right Click you can choose Copy to Clipboard. No Right Click > Paste From Clipboard however 8-(

Happy pasting!!!

Keep in mind that this will only work if the sheet has NO views on it!

Wednesday, August 09, 2006

AU 2006 Blog

Not the first mention of this. Autodesk University 2006 draws nearer day by day and Joseph Wurcher now has a blog dedicated to this event. Joseph Wurcher's role? In his own words, "My contribution to AU is to manage content, select speakers & topics, scheduling and other logistical duties."

He's started the blog: Autodesk University 2006 Agent of Change to chart his efforts, experiences and provide information.

If you get a chance check in from time to time?

Tuesday, August 08, 2006

Why a Local File?

A fairly common reason offered for having Local Files (storing them on our local PC too) for projects using Worksharing is to improve the disk drive access to data. I believed it, others have believed it, yet it isn't really true.

One of the things I've personally enjoyed about Revit is the active role the founders of Revit take in the Revit Community. So recently when yours truly, among others, offered this story...again, Irwin Jungreis could stand it no more! (kidding)

He wrote the following in a reply at the Revit forums at AUGI.

"The purpose of having separate local and central files is not to handle the network traffic, but rather to give the user control of when his changes are synchronized with those of other users." "If the only time the local file was synchronized was when you closed the file, you wouldn't be able to get other people's changes during your session, or give them your changes." "If it automatically synchronized when you closed the file you wouldn't have a way to keep your changes separate until you were ready to publish them, or avoid having other people's changes come into your session until you were ready."

Irwin, thanks for saying so!

(remember to view a thread at AUGI you'll need to log in, join)

Saturday, August 05, 2006

Tagging the Un-Taggable

With the release of Revit Building 9 rooms took on some new characteristics. One such feature is that you can place a room and tag in a floor plan even though there are no walls surrounding it. Error message to be sure but you can...

Second you can drag a room and its tag out of a defined location and place it in another location or simply off to the side to wait for a better home.

If you delete the tag in either case you won't be able to re-tag it until the room is properly bounded again. So take care...

Another gotcha, if you drag a room and its tag out of a room, yet the room is still tagged in other views you'll get an error letting you know that it isn't properly enclosed.


No mention of the other tags in the wrong location. That is, at least not until you place the room in a properly bounded location again. Then Revit will let you know...


If you click the little Expand Warning Dialog button you can review the issue.


Lastly, follow the arrows in the image below to track down the errant tag.


One more for the road...if you delete a room it is removed from the schedule, gone! In the past you had an option to keep the room pending a new location perhaps. Regardless it was possible to keep it and let it appear in a schedule until you defined its new home. Not anymore and I think it should be restored to the previous behavior because I'd like to have the option to keep program items in my schedule if they need to be relocated.

The work around is to cut it to clipboard and paste the room back in elsewhere. At least this is necessary if the room needs to change levels. Otherwise just move it out of a room bounding location with its tag, somewhere off to the side.

Friday, August 04, 2006

Which one STC or...STC?

STC, is short for Save to Central, (SWC is short for Synchronize with Central as Revit 2010 calls it now) is a common thing when you are working with Revit's Worksharing enabled. It is how we publish the work we have completed, return things we have borrowed and have the changes others have made placed in our Local File.

While working in your Local File take another look at the first row of toolbars and you'll find two SAVE Icons. The first is Save Local and the second is Save To Central for versions prior to Revit 2010.


These are the new buttons in Revit 2010 for Synchronize with Central as it is now called.


Under the File menu you'll find these, Save, Save As and Save to Central.


For Revit 2010 there is no File menu, there is the Application Menu and it does not have options for Synchronize with Central.

There IS a difference between the toolbar Save to Central (and Synchronize with Central) and the one found under the File menu. Most obvious is that this dialog box doesn't appear when you pick the toolbar button (or the Synchronize Now button).


This dialog only appears when you use File > Save To Central. Be sure to check all the boxes (except for Compact..., do that once at the end of the day) to return the stuff you borrowed, see I left the user created workset unchecked, setting a bad example!! Don't forget to check box the "Save the Local after Save to Central completes successfully" too!

With Revit 2010 a new option is described at the bottom of this dialog. Revit now Saves the local file first and then Saves it again after the SWC completes. This protects your local file before SWC and then saves the changes that occur in your local file after the SWC is finished. This process is important to keep your local file synchronized. It is important to check the option, which is checked by default now.


The other key difference between the toolbar and menu is the toolbar button does NOT return User Created worksets. It will return the Families, Project Standards and View worksets. Think of the toolbar button as the "quick" STC/SWC.

Friday, July 28, 2006

Sports Fan?

An opportunity to combine your love of sports, architecture and Revit is waiting for you. HNTB in Los Angeles is looking for talented Revit savy architects to do sport (and Aviation) projects.

Interested? Search available positions ONLINE. Alternatively you can contact the Los Angeles office directly.

Thursday, July 27, 2006

Face Off

A new family template doesn't get much attention. It is called Generic Model Face Based.rft. From Autodesk Revit's help file:

A face-based family must be created from the Generic Model face based.rft template. A face-based component can be placed on any surface, including walls, floors, roofs, stairs, reference planes, and other components. If the family contains a void cutting the host, the component will cut its host, but only if the host is a wall, floor, roof, or ceiling. When a component with a void is placed on any other host, it will not cut.

Interestingly, a void family, when nested in another, will cut a solid that hosts it.

Take a closer look at this kind of family and see if it might be useful? This image is a face based void applied to various faces of hosts.

This image is a face based family void placed on a solid in another family. Then used an array in two directions. A glass solid was included in the array groups to infill the hole. Some possibilites?


Here's another example using a Face Based "window" hosted in another family to create a "confetti" wall or a seemingly random arrangement of windows. Design belongs to HOK.

Thursday, July 20, 2006

Which Came First? The Solid or the Void?

...and the other short story...why did the solid cross the road? Sorry I digress.

So you're making a family and you made this solid and then you made this void and Revit cut away the solid just fine. Now you make a new solid and the void acts like it doesn't know it is there even though they intersect. Voids only automatically cut solids that came before, not those that followed. So...when a void doesn't cut a solid because of the order you created them, just use Tools > Cut Geometry and tell Revit to cut em!Worth mentioning, if you create a void and it doesn't intersect with the geometry of the earlier solid(s) when you finish the sketch, when you drag the void so it does intersect with the solid, it won't cut automatically either. Even if the solid was made earlier than the void. So again, Tools > Cut Geometry to the rescue.aaah...all better now...

Phased by Your Exports?

When you export your project to dwg files do they lack the reference to the phases of your project? The default dwg/dgn export files do not include the information that Revit needs to specify the layers according to phase. It just so happens that there is a Autodesk Knowledge Base article that explains how to resolve this. If you want to search yourself, try the words "phase export" to get a link to the article. Too tired to click the link? Here's the text from the site:

Issue

You want to know how Demo, Existing, New, and Temporary layers are included when a file is exported to DWG and DGN.

Solution

The default export files, Layers-dgn-AIA.txt and exportLayers-dwg-AIA.txt, do not include appendices for -DEMO, -EXIST, -NEWW, or -TEMP layers for demolished, existing, new, and temporary objects in the model.

These definitions can be added to the templates by adding the following lines to the exportlayers-dwg-AIA.txt file (located in the Data directory):

Demolished -DEMO -DEMO
Existing -EXST -EXST
New -NEWW -NEWW
Temporary -TEMP -TEMP

The following lines can be added to the exportlayers-dgn-AIA.txt file (also located in the Data directory):

Demolished 50 1 50 1 -DEMO -DEMO
Existing 51 1 51 1 -EXIST -EXIST
New 54 1 54 1 -NEWW -NEWW
Temporary 58 1 58 1 -TEMP -TEMP

You can download [Link: RF111d01.txt] exportlayers-dwg-AIA.txt and/or [Link: RF111d02.txt] exportlayers-dgn-AIA.txt and copy them to your [Revit_install_directory]/Data directory.

Sorry you'll have to visit the site to get the files. The date published for this article says 20060405 but I know that I read it earlier than that this year, perhaps it's been modified? I seem to recall it being a couple years old.

Hong Kong Anyone?

Eric in Hong Kong has a blog that I stumbled on tonight. He's civil professional who has joined an Autodesk distributor called Synnex. His blog is found at CADBeyond. He's blogging about more than just Revit but he has dedicated quite a few articles to Revit topics. Cheers!

Wednesday, July 12, 2006

Revit Build and Downloading Errors

If you recently experienced problems downloading content or help files for Revit Building 9. Try again, they have posted a new build that worked fine for me just now. The build number is still 20060619_2300 but the download file has "a" added to it like this:

Revit Series = ARS9_20060619_2300a.exe
Revit Building = RevitBuilding9_20060619_2300a.exe

Download it HERE! Choose your language first.