Revit Building 9 (20060518_2300)
The following text is from the Autodesk site:
This build (20060518_2300) addresses a reported area tolerance issue in Revit-based release 9 project files. It also addresses measurement-related issues discovered in DWF™ files produced from Revit-based release 9 project files.
Note: This update incorporates issues previously addressed in the last build (20060426_2300). Specifically with Autodesk Revit Building 9-based projects utilizing linked files, and issues relating to cascading network licensing for the Autodesk AutoCAD Revit Series—Building 9 products.
Download HERE
Revit Structure 3 (20060511_2300)
The following text is from the Autodesk site:
This latest build (20060511_2300) fixes a memory leak problem currently found within Autodesk Revit Structure 3-based software products. It also resolves a conflict where files utilizing Links was found to impact application performance. In addition, the updates resolve an issue within cascading network licensing for the Autodesk AutoCAD Revit Series—Structure 3 product discovered when only Autodesk Revit Structure 3 was installed from the Series bundle; a condition found to prevent license access."
Download HERE
Wednesday, May 31, 2006
Thursday, May 25, 2006
New Revit Blogs
A couple new Revit blogs to mention.
First Robert Manna with Burt Hill started his Don't Think: Do Revit blog in early April. The blog is his journal as he and his firm implement Revit.
Second is Brad Hartnagle's Green Revit blog. Brad is an Avatech staff member who has decided to blog about BIM and Green building.
Check them out when you get a chance!
Wednesday, May 24, 2006
Drawing List - Consultant Drawings
Just want to know how to make a drawing list? Mike Hardy-Brown posted a tips & tricks article on HIS SITE.
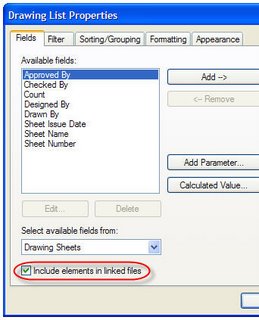
If you need to include your consultant's drawings in your list there are two common methods and a slightly distant third: Dummy Sheets, Annotation text list and image file of an external list.
The dummy list means you create a sheet for each of the consultant's sheets, supplying only the number and name.
This list will clutter your project browser so you might consider putting this list in a separate empty project that you link back into your project.When you make the drawing list check the box to include linked files so you can schedule them too.
 One bonus that comes from using this approach is that you can also create dummy detail or drafting views that correspond with details in your consultant's set. This will permit you to use the reference other view option to create callouts that refer to their details.
 I have done this in the past to coordinate details with overlapping site information like concrete stairs and railings that approach a building.
The second method using text means you've got to copy and paste the data from another source into a text object in a Revit view. You could just type it all in yourself too.
Last some folks will just create a pdf of the list supplied by others and save in bmp or jpg format so it can be imported into Revit.
Wednesday, May 17, 2006
Survey Says...Got Rendering?
Autodesk has created another Revit survey to gather information about Rendering. If you are one of the group clamoring for Vizrender, Vray, Maya, Blender, Max, Artlantis, Maxwell, or just want Accurender 4...maybe something entirely different inside? Now is your chance to tell Autodesk what you really think about the rendering engine inside Revit. Take the
SURVEY HERE.
It stays live for the next 10 days "ish"...and it takes a little less than 10 minutes assuming you don't write an essay in the comments field 8-)
SURVEY HERE.
It stays live for the next 10 days "ish"...and it takes a little less than 10 minutes assuming you don't write an essay in the comments field 8-)
Tuesday, May 16, 2006
An Opening or an Opening?
There are several ways to create openings in walls. Imagine a corridor with alcoves leading to rooms...
You can create a wall based component family that cuts a hole in the wall.
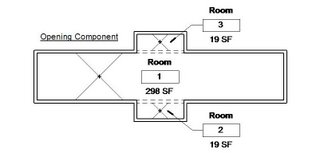 If you want to maintain the area of each room on either side of the wall and have an opening then you need to consider the component route.
You can use the Modelling > Opening feature.
 Using this approach breaks the ability of a wall to be room bounding (in that location). Room area leaks out right through, which is okay if that is what you need or want. This feature is a bit tedious to use because you have to select the wall and then sketch over the portion of the wall where the opening should be, but you can't snap to things to do so accurately at first. Using the Align tool makes it a bit easier to make sure the opening is flush with the alcove walls. Take care to define the height accordingly.
You can edit the profile of the wall.
 Just the like the previous, using this approach breaks the ability of a wall to be room bounding, which is okay if that is what you need or want. Also a bit tedious to place because you need a section or elevation view of each wall to edit the profile, or be able to see the wall in a 3D view.
You can also use separate wall segments and put a wall above the opening using a Base Offset value. In this example I used the linework tool to make the outside edge visible as an overhead linetype.
 This approach is pretty easy as long as the little segment doesn't rejoin the longer walls.
If you like one of the methods that also breaks the room bounding behavior of the wall you can use a room separation line to fix it.
Decisions Decisions...which one should you use? If you want room area to flood into the adjacent room then you can't use the component family approach. If you you don't then I prefer the component family. But...it's your call!!
Friday, May 12, 2006
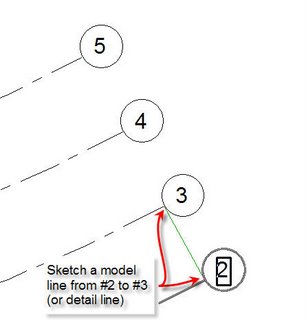
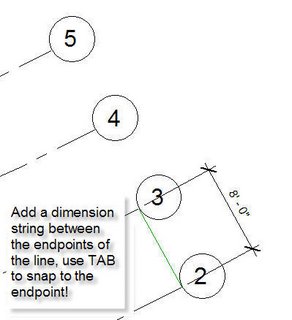
Dimension Parallel Arc Grid Lines
Ever wanted to do this?
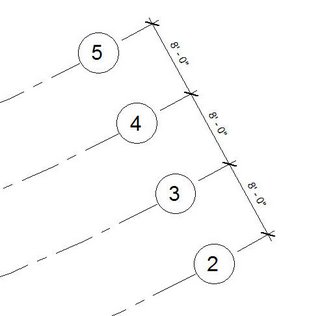
Probably have tried and found that Revit won't? Some folks resort to adding little detail lines and dimension to those instead. This tip is brought to you by Kevin Parks, a hard working HOK Revit user in Dallas. He showed it to me the other day and I warned him that I'd have to share it! Thanks Kevin!
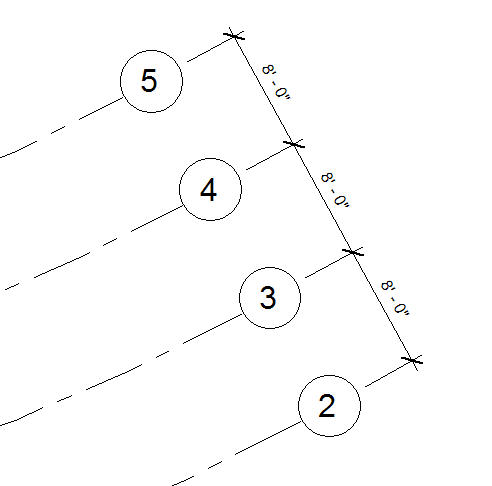
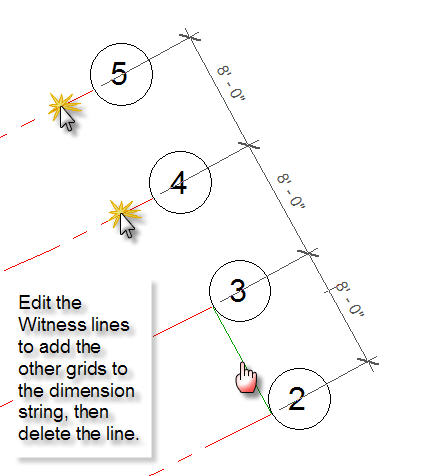
So start off like this...follow the "bouncing ball"...
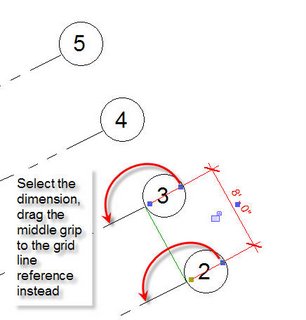
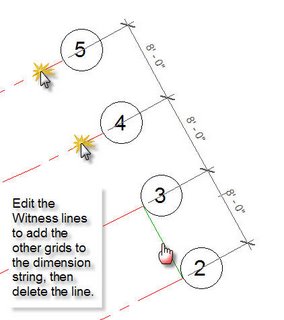
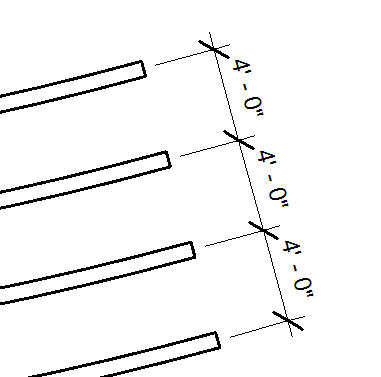
Wrap it all up by adjusting the object offset so the witness lines finish up as desired. Refer to the first image for the final product. This works assuming the grid lines are parallel. Yep...works for walls too!
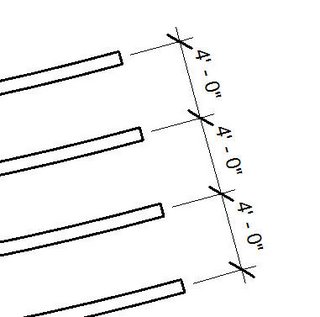
Sorry...no bouncing ball, just me trying to be amusing...
Probably have tried and found that Revit won't? Some folks resort to adding little detail lines and dimension to those instead. This tip is brought to you by Kevin Parks, a hard working HOK Revit user in Dallas. He showed it to me the other day and I warned him that I'd have to share it! Thanks Kevin!
So start off like this...follow the "bouncing ball"...


Wrap it all up by adjusting the object offset so the witness lines finish up as desired. Refer to the first image for the final product. This works assuming the grid lines are parallel. Yep...works for walls too!
Sorry...no bouncing ball, just me trying to be amusing...
Thursday, May 11, 2006
Thumbnail Explorer Released into the Wild
Raizlabs has released Thumbnail Explorer. This is an interesting product, a graphical search engine for your PC and network, with interesting possibilities for viewing/finding Revit content not to mention other file types.
From the website:
Thumbnail Explorer is the perfect tool for anyone who deals with graphics, office files or CAD and has more then a handful of files.
The software allows you to quickly and easily find any file across multiple folders without browsing or using Windows search. As you type a part of file name Thumbnail Explorer will show a list of thumbnails and will enable you to work with corresponding files without resorting to Windows Explorer.
Search and thumbnail extraction done as background process that guarantees interactive responsiveness even when searching through hundreds of thousands of files.
The software features tight integration with Windows Explorer. Double click or drag and drop search results into their native applications. Or right click to see the same context menu as in Windows Explorer.
Customize our tabbed interface to your work environment and files
Easy to use interface requires no training
Do you recognize the name Raiz? Leonid Raiz is one of the two founders of Revit, Irwin Jungreis being the other. Leonid's son Gregory founded Raizlabs 1997. Leonid has been working, in his spare time, on Thumbnail Explorer since retiring from Autodesk about two and half years after selling Revit to Autodesk. He recently released it to a small beta group and is now pleased to release it to the general public as a Raizlabs product.
From the website:
Do you recognize the name Raiz? Leonid Raiz is one of the two founders of Revit, Irwin Jungreis being the other. Leonid's son Gregory founded Raizlabs 1997. Leonid has been working, in his spare time, on Thumbnail Explorer since retiring from Autodesk about two and half years after selling Revit to Autodesk. He recently released it to a small beta group and is now pleased to release it to the general public as a Raizlabs product.
Saturday, May 06, 2006
Revit in Portugal x 2
André Cardoso has joined Fernando in providing blog based Revit information. If you like or need your Revit data in Portuguese...now you've got yet another option! Be sure to check it out! His blog is called Up to Work. Happy reading!
Walking on Thin Ice
Another post about shared parameters. Here's the warning you'll find in a shared parameter file.
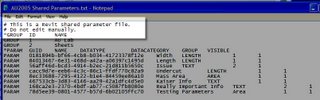 If you've dabbled or dug in seriously with shared parameters you've most likely made a mistake naming or choosing the type for a parameter. The interface Revit provides doesn't allow you to change a parameter once you've entered the data and finished. The only route is to delete and redo....or is it?
It is just a text file technically so you can open it with Windows application, Notepad. Best not to open it in Word or similar since you could inadvertently save formatting data in the file rendering it useless to Revit.
Required Disclaimer: In light of the above image doing anything I suggest will not be supported by anyone if something goes wrong, you venture out on "Thin Ice" at your own peril. If you have used the shared parameter in a project and have data associated with it don't go here...walk away. You'll lose data. Scared yet? No...okay carry on...
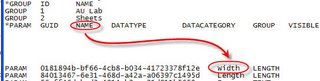
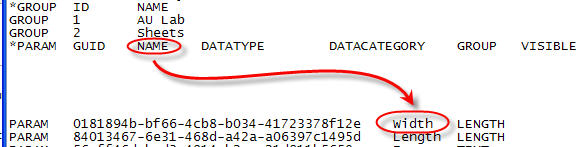
If you examine a shared parameter file, each value has a role.
If you need to rename the parameter, rename it here >
 If you need to redefine the type, do it here >
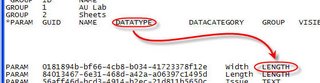 Keep in mind that you have to enter the type value exactly as Revit expects it to be written otherwise it isn't going to work.
If you want to get a parameter from one file into another, just copy the entire string from one to the other.
 I don't know how many people will care about this or perhaps run away but during a discussion about this recently I tried it to fix something and found it helpful.
This is only really useful if you are in the process of creating parameters and make a mistake. If you've already implemented a project or content using the parameters it may be more "costly" to change than it is worth. You be the judge.
 If you've dabbled or dug in seriously with shared parameters you've most likely made a mistake naming or choosing the type for a parameter. The interface Revit provides doesn't allow you to change a parameter once you've entered the data and finished. The only route is to delete and redo....or is it?
It is just a text file technically so you can open it with Windows application, Notepad. Best not to open it in Word or similar since you could inadvertently save formatting data in the file rendering it useless to Revit.
Required Disclaimer: In light of the above image doing anything I suggest will not be supported by anyone if something goes wrong, you venture out on "Thin Ice" at your own peril. If you have used the shared parameter in a project and have data associated with it don't go here...walk away. You'll lose data. Scared yet? No...okay carry on...
If you examine a shared parameter file, each value has a role.
If you need to rename the parameter, rename it here >
 If you need to redefine the type, do it here >
 Keep in mind that you have to enter the type value exactly as Revit expects it to be written otherwise it isn't going to work.
If you want to get a parameter from one file into another, just copy the entire string from one to the other.
 I don't know how many people will care about this or perhaps run away but during a discussion about this recently I tried it to fix something and found it helpful.
This is only really useful if you are in the process of creating parameters and make a mistake. If you've already implemented a project or content using the parameters it may be more "costly" to change than it is worth. You be the judge.
Wednesday, May 03, 2006
New Build of Revit 9 Posted!
Saturday, April 29, 2006
Cropped and Nowhere to Go!
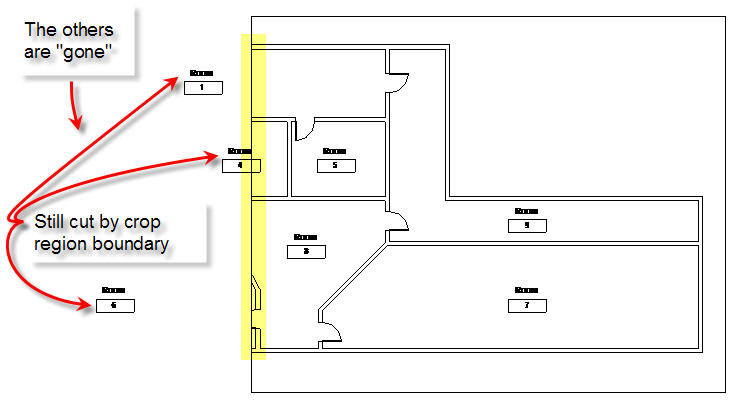
A subtle twist of the new Rooms in Revit Building 9 is that the tags for rooms will not show up when the crop region of a view does not intersect the room.
If you recall in the past a room tag would linger off in space outside a crop region when you set up a partial plan etc. Then you'd have to delete those orphans. Now they just disappear from view automatically. The exception to this is irregular shaped rooms that still cross over the crop region's boundary.
BEFORE CROPPING:

AFTER CROPPING:
Need an Excuse to go to Australia?
Any Revit user/fan that needs an excuse to visit Australia now has a great one. To mix Revit and travel you just need to attend the Revit User Conference. It runs from October 26, 2006 through October 29, 2006. Check it out!!
Here's a reprint of the schedule as it appears on the conference web site.
Day 1 Thursday, October 26
9:00am Setup
1:00pm Introduction to Revit Building 9
2:50pm Introduction to Revit Systems 1
4:40pm Introduction to Revit Structure 3
7:30pm BBQ - meet and greet
Day 2 Friday, October 27
7:00am Breakfast
9:30am Welcome and Intro
10:30am Morning Tea
11:00am Keynote
12:30pm Lunch
1:30pm Modelling - Basics - Modelling - Advanced
3:00pm Afternoon Tea
3:30pm Families - Basics - Families - Advanced
7:30pm Dinner
Day 3 Saturday, October 28
7:00am Breakfast
9:00am Documentation - Basics -Documentation - Advanced
10:30am Morning Tea
11:00am Classroom 1 - Linking, Worksets, Shared co-ordinates
Classroom 2 - Phasing, Massing
Classroom 3 - Design Options, Scheduling, Workplanes
12:30pm Lunch
1:30pm Rendering - 3rd Party rendering
3:00pm Afternoon Tea
3:30pm Best Practices
5:00pm Gala Dinner
Day 4 Sunday, October 29
7:00am Breakfast
Tuesday, April 25, 2006
Units Units Units! Unit Plans?
Autodesk Revit is inquiring about unit plan requirements. What do we do? Why do we do it? They have posted a short survey to respond to. You can supply your comments at the end of the survey.
Take the SURVEY if you care about UNIT PLANS!! Can you say improvements to Groups? Let's hope they come up with something great!
Take the SURVEY if you care about UNIT PLANS!! Can you say improvements to Groups? Let's hope they come up with something great!
Saturday, April 22, 2006
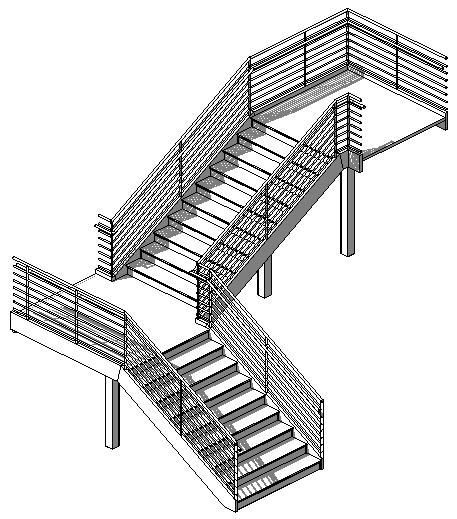
A Flat Slope?
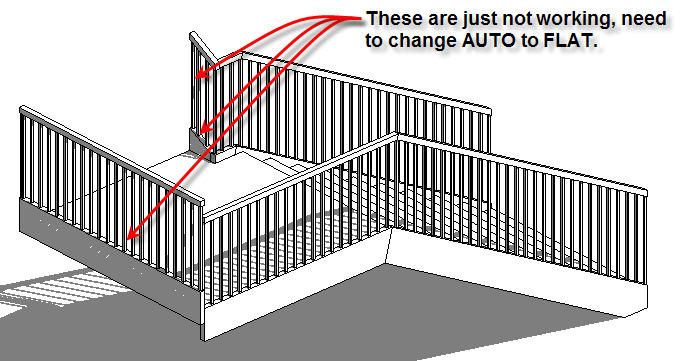
When working with stairs or railings there is a parameter associated with the sketch lines that define them. It is called SLOPE. There are three settings: AUTO DETECT, FLAT and SLOPED. Keep in mind that only the BOUNDARY sketch linetype has this parameter. The others are RUN and RISER, they don't. There is no special name for railing sketch lines, just called LINES. They also have the parameter.

Typically the setting AUTO DETECT is sufficient. When you need to create stairs that are a little less than simple you will find these play a much larger role. Take a look at this image where we'd like to end the stair at the landing.
 Now the trick to ending like this in the first place is to use a RISER not a BOUNDARY sketch line at the end.
This stair has been told not to end with a riser yet the stringer at the inside corner is desperately trying to slope, and SUCCEEDING! Also the stringer at the far end of the landing and its railing are both too high. The stair and railing sketches just need a little SLOPE attitude adjustment.
Setting them specifically to FLAT lets them behave. To apply this change you must be in SKETCH MODE to select each line segment. When one segment is selected you can alter the parameter. You cannot apply this change to multiple segments, it would be nice if we could.

So this is the result!

I should also mention that when you make a stair Revit will automatically create a railing, if you let it. As long as you never edit the sketch of the railing Revit will keep track of it. As soon as you edit the sketch for the railing Revit hands over the responsibility for the integrity of the railing sketch to you, preferring to avoid making a change to it that you may not have wanted.
Till next time here's a few parting images! Cheers!


I recently recorded a VIDEO to describe this too. You can listen and sort of watch here.
Monday, April 17, 2006
Revit on the Rocks!
Rather...Revit Rocks!! Yet another Revit blog joins the fray. Daryl, the man who brings you DGCad and Revit tutorial videos has started a blog. Check it out!
Friday, April 14, 2006
Text Settings
One thing I've always wondered about...why isn't there a Settings menu selection for Text Styles?? Nearly every other project setting does yet text doesn't...seems unfair to me.
To manage text styles without this you have to either start the Text command or edit existing text objects to modify or create a new text style. I guess we don't have to make text styles very often? Is that the assumption perhaps? Still seems unfair!!
If I were elected President I'd make sure Text gets a fair shake!!
(that and fix the elevation TAG!)
Thursday, April 13, 2006
Workset Visibility in Linked Files
We don't have discreet control over workset visibility in linked files on a view by view basis yet (not in RB9 either). We DO have the option to specify what worksets shall be linked in when we import the file initially, project wide mind you. When you use File > Import/Link > Rvt choose Specify.
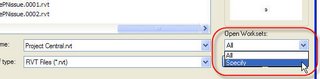 Revit will offer you the Workset dialog to choose which worksets to open or close.
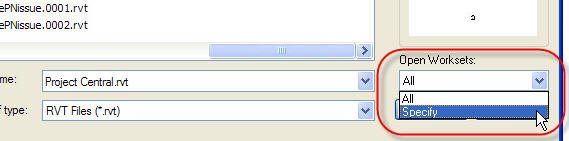
When we need to change these settings we have to use File > Manage Links > then choose Reload From
 Now specify which worksets you need again.
 Revit will offer you the Workset dialog to choose which worksets to open or close.
When we need to change these settings we have to use File > Manage Links > then choose Reload From
 Now specify which worksets you need again.
Rooms in Revit Building 9
One of the first things you may stumble a bit with Revit Building 9 is Rooms. They are now an actual element like a Wall, Door or Window, you place a Room and tag them. The tags no longer define a room. They are just like a door tag, displaying important information only.
The Area Analysis tab on the design bar has become the Room and Area Tab.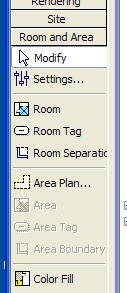
You'll find separate commands for Room and Room Tag under the Drafting menu. On the Basics design bar tab you'll find the Room command. The Room Tag command is found on the Drafting design bar tab.
You can now tag a room in section views. You cannot place a room in section nor select it however. You CAN select a room in a schedule, then choose Show from the options bar now.
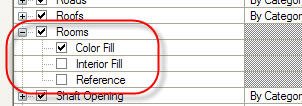
There is a new Room Model Object category in Visibility/Graphic Overrides and three sub-categories. The Room category is off by default in section and elevation views.
Color Fill governs the display of any color fill applied to the view. It doesn't affect the legend. Interior Fill turns on the system controlled light blue fill that you see when you are placing rooms, tagging or selecting them. Reference displays the crosshair and drag grip that you see when you place, tag or select Rooms.
More about Rooms later. Be sure to take a look at the help topics for Rooms, they have been updated to describe their new behavior and features.
The Area Analysis tab on the design bar has become the Room and Area Tab.

You'll find separate commands for Room and Room Tag under the Drafting menu. On the Basics design bar tab you'll find the Room command. The Room Tag command is found on the Drafting design bar tab.
You can now tag a room in section views. You cannot place a room in section nor select it however. You CAN select a room in a schedule, then choose Show from the options bar now.
There is a new Room Model Object category in Visibility/Graphic Overrides and three sub-categories. The Room category is off by default in section and elevation views.
Color Fill governs the display of any color fill applied to the view. It doesn't affect the legend. Interior Fill turns on the system controlled light blue fill that you see when you are placing rooms, tagging or selecting them. Reference displays the crosshair and drag grip that you see when you place, tag or select Rooms.
More about Rooms later. Be sure to take a look at the help topics for Rooms, they have been updated to describe their new behavior and features.
Wednesday, April 12, 2006
Revit Building 9 is Released and Shipping
Finally!!! Revit Building 9 has been officially released to the Web and is now shipping to subscription customers. Download it HERE. The main site for Revit Building is HERE.
Revit Structure 3 is also available for download now.
In the near future we also will see the release of the brand new Revit Systems 1, stay tuned.
Revit Structure 3 is also available for download now.
In the near future we also will see the release of the brand new Revit Systems 1, stay tuned.
Tuesday, April 11, 2006
Revit Em Portugal?
I've neglected to mention that there is a blog dedicated to those Revit users who speak Portuguese, Revit Em Portugal. Fernando hails from Leiria, Portugal and has been using Revit for quite some time now, perhaps longer than anyone in Portugal. He'd have to confirm that bit of speculation though. He started the blog in January and fortunately for me there are quite a few images to help me figure out what is going on. Yet another Revit blog to highlight my single language liability!
In addition to the blog he is host to a user bulletin board community similar to those listed on my links sidebar. It is called RevitPT. If Portuguese is your native tongue or your favorite second/third language do check it out.
In addition to the blog he is host to a user bulletin board community similar to those listed on my links sidebar. It is called RevitPT. If Portuguese is your native tongue or your favorite second/third language do check it out.
Subscribe to:
Posts (Atom)