Friday, September 16, 2005

Are You a Special Character?

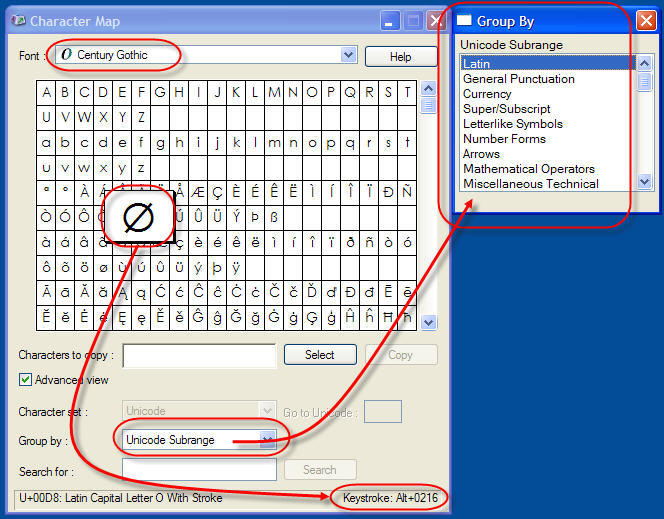
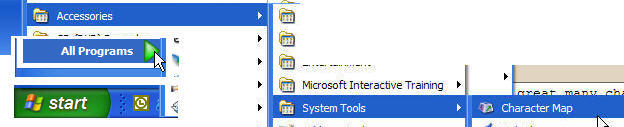
Rather…do you want to use one? True Type Fonts have a great many characters and symbols that go beyond just the routine letters and numbers. Some have more than others. If you want to use them as part of your text in Revit you can use the Windows Character Map application to copy and paste them or make a note of the key combination to “type” them in.


Assuming you are in the process of either typing text or editing text...the “trick” is to use the numeric keypad, the ALT key and type in the number assigned to the symbol. First you enable the numeric keypad, then you press and hold the ALT key and finally type the number (diameter symbol for Century Gothic is 0216). When you let go of the ALT key the symbol appears.


Note, you can’t use the numbers along the top of the keyboard, you have to use the keypad area. Using a notebook computer, you’ll need to type the letters assigned to the NUM lock function.

Thursday, September 15, 2005

Plain As The Nose...

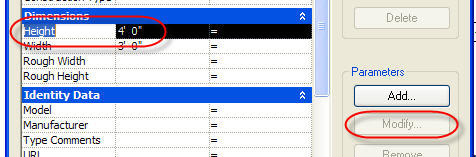
Family editor tip: When you have a Type parameter that you can’t change to Instance in the Family Types dialog box because the modify button is inactive...


…don’t fret! Close the dialog box, select a dimension that is assigned to the parameter and take a look at the Options Bar.


Notice the check box next to Instance Parameter? There you go! Thanks to Steven Campbell for the wake up call! Sometimes the answer is as plain as the nose on your face!

Friday, September 09, 2005

It Takes All Types

Here's a tip for Family Editor's, using the Family Types dialog, enter a value into the formula field and click apply, then delete the value. Revit applies the value to all the family's types.


Bewildered...here's the background info...thought I'd get the tip out quick first? Yes, I'm quirky...

Working with Revit Families that have many types can be problematic when you need to work on them. You run the risk of breaking a perfectly good family when you don't make sure every type has the "right" value. So typically you have to switch to each type and enter a value, repeat, rinse till done.

A few moons ago I posted a wish at AUGI for a faster way to propagate parameter changes to all the types in a family. I suggested a button to do this. What happened is Matt Jezyk, one of Autodesk Revit's Product Designers who goes all the way back to Revit Technology Corp. days, replied with this killer tip. It is one I use very often and am grateful he shared it.

THANKS MATT!

(one caveat...you can only enter numbers into the formula field so it isn't going to work for text values unless you place quotes around the text like "My Value". One more...you must be explicit with units, you must define inches using the double quotes. Entering 0-4 will be treated as subtraction not 0'-4", you have to enter 4" to get the correct value)

Tuesday, September 06, 2005

8.1 Nugget for Family Editors

For those who spend a lot of time in the Revit Family Editor, a little golden nugget is lurking in the latest release of Revit. Prior to 8.1 if you renamed a parameter that was part of a formula(s) Revit would delete the formula(s) that used it, OUCH! This meant you had to very careful when making a change like this.

NOT ANYMORE! It's fixed! Now when you rename said parameter it gets renamed in the formula(s) automatically! Very nice!

Thanks!!!

Thursday, August 25, 2005

Sneaky Buttons

Not those campaign buttons with pins but the button you push…or rather click with a mouse. There are a few pesky buttons in Revit that new users find strange. Lets take a look at em?

First up is the “EDIT” button, the long thin one you see when you visit the properties of walls, roofs, floors etc.


Yes it is a button even though it is really thin and long…don’t be afraid, click it! Don’t be fooled when you see this button lurking next to parameters like View Range, Visibility or Advanced Model Graphics either.

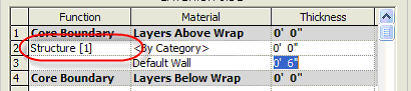
Next up, the material button. It is invisible until you do something, like click in the field that shows the material name. Again this is lurking in the properties of objects and in several locations.


After you click the area listing Default Wall as in the image above you see this:


Yes, again that little horizontal line with a down arrow IS a button too, clicking it will load up the Materials dialog

What’s next…hmm...how about the “LIST BOX” button? It looks like this before you do anything…


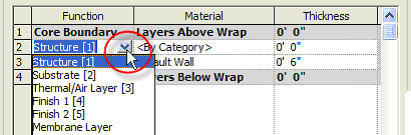
Pretty innocent looking, in fact you have no idea there is a button lurking here either, but as promised there is! Click inside the field and you should see this


Click on that little “V” and you’ll get this, a list of choices.


This little guy shows up all over the place, best get to be friends quick!

Anymore to talk about? How about the family editor’s link parameter button? That’s a good one too!


Talk about low profile and sneaky!! This one is lying in the bushes waiting to bite your ankle. Clicking on this button will allow you to choose a parameter to assign to the parameter the button shares a row with. In the image above this button is tied to the Offset parameter in the family, an instance parameter by the way…uh oh…here we go talking about parameters again.

Yet another…the “Corporal” (like the stripes an Army Corporal would wear)…actually the button is the entire blue bar yet the buttons are meant as a indication what will happen, namely the list will contract to hide the list of parameters in the group.


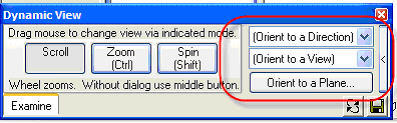
What? Another one? Yes there is, the little expand button for the Dynamically Modify View feature.


A little click and you get.


The dialog expands to show more options. Then if you click the button at the far right it contracts again.

Quite a few quirky buttons eh? Hope it helps!!

Sunday, August 21, 2005

Smoot?

I was reading a fellow blogger's post tonight and thought I'd place a link to it just in case others might not visit his blog. It's a funny story about how we have another unit of measure, the Smoot!...check it out here:

Robin's Blog is a Smoot

[Category: Info, trivia]

Friday, August 12, 2005

buildingSMART (Get Over It)

It's a very SMART article written by Mario Guttman,vice-president and the Firmwide CAD Director for HOK. I really enjoyed it, and recommend you read it too. I'm not saying so just to try to impress him either, not that it would even work...

It is an article written for Lachmi Khemlani's AECbytes site. Here's a link to the article:

buildingSMART

Hope you enjoy it to!

Wednesday, August 10, 2005

Profiles of Structural Shapes

I've often wondered why there is no library of structural shape profile families. I still wonder why and I know I'm not alone...but I have made three families now including the type catalogs for them (C channel, HSS Hollow Tube and W -flange) They are located in the Revit Families forum at AUGI. Here's a link to the forum:

Structural Shape Profiles

Hope it helps!

Monday, August 08, 2005

AU 2005

By my count there are 32(ish) Revit Building and Structure classes at Autodesk University this year! Big numbers! Cool!

Last year I worked with David Conant during his Family Editor class. I wish I could say that I was more than a "Vanna White" to his "Pat Sajak" but I wasn't wearing a gown, but then nobody boo'd...that I heard! hehe... But I did turn the letters (slides) VERY WELL!

So this year I will be teaching a class (3.5 hour Lab) BD21-1L Autodesk Revit Family Editor: From the Beginning. I'm also very pleased that David has agreed to be a co-speaker in this lab. In fact this lab is meant to be complimentary to his class, BD35-2 Take Your Family to the Next Level.

I had hoped that the lab would follow David's class chronologically at AU, but his class follows the lab instead. So make sure you attend both regardless! The class titles make sense ordered this way though, eh?

Here's a link to my lab: BD21-1L: From the Beginning
David's lecture: BD35-2: Take Your Family to the Next Level

I'm looking forward to it!

Hope to see you there! If you see me and I don't see you...make sure we fix that!

[Fixed the links to the handouts that are now archived at AUGI. 12/31/09]

Wednesday, August 03, 2005

Is you Is or Is you Ain't

Are you confused? Okay, I mean are you confused about the “Is Reference” parameter of Reference Planes? If not, sorry I distracted you…

If you are, care to read on?

Am I assuming too much?
Do you know about this feature? If I am and you don’t, it is a parameter of Reference Planes, not in projects, only in the family editor. Here’s what it looks like in the properties dialog.
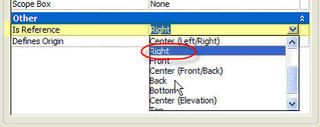


Now for the long winded explanation
When you choose an ”Is Reference” value you are telling Revit that this Reference Plane is the same as any other, in other families, by the same name. Big deal you say?

Let’s say you have a door in a wall and you’ve decided to make sure the door is 4’-0” from the nearest wall. (You’ve added a dimension and locked it)


When you later decide to use a different door Revit seems to know how to switch the doors yet maintain the same position.
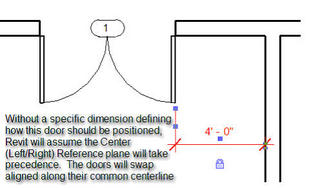
Magical eh? Well sort of, “Is Reference” is the magic. You’ll have to trust me when I tell you that all stock Revit door families have “Is Reference” values assigned to each important Reference Plane. Okay, I know this is on the internet and you are supposed to believe everything you read on the internet but here’s an image to prove it, at least for the door in the image.
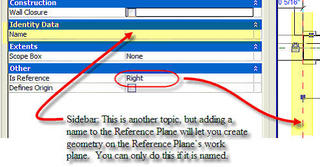
Notice there is no name value. This points out that a Reference Plane can be a “Strong or Weak” reference even if it isn’t named.

Oh great, introduced yet another concept without explaining it! Sorry, let me fix that now. Each Reference Plane can be “Strong” or “Weak”, in fact you can choose “Strong”, “Weak” or “Not a Reference” in addition to specific names like “Right”, “Top”, “Bottom”, etc.

A “Strong Reference” has the highest priority for dimensioning or snapping. That’s straight out of Revit’s help document! There IS good information there, don’t forget to check it out!

Ever notice when you dimension objects they offer you certain Reference Lines, yet tabbing sometimes offers you yet other options? This is “Strong” and “Weak” in action. A “Weak Reference” means you may need to use the tab key feature in order to use it for your dimension. Zooming in and out also affects how these two will act when you place dimensions.

Just remember that a “Strong Reference” gets your attention first when there are other, lesser, Reference Planes present.

Back to “Is Reference”, by choosing one of the predefined names (view descriptive) you are establishing two things, a “Strong Reference” and a common Reference Plane for Revit to use when you want to switch families.

If you don’t want a Reference Plane to take on such a role, don’t choose a name or choose “Not A Reference”. If you want your Reference Plane to be unnamed and play a lesser role than your “Strong” Reference Planes, choose “Weak Reference”.


Instance Parameters, Shape Handles and Is Reference

(Note: I forgot to include this part, many thanks to Steven Campbell for pointing out my oversight?)

[Edited 9/2/09: A reference plane's IsReference parameter can be weak or strong and define grips when paired with Instance Parameters since version 2009 and 2010]

As you may or may not know already, Revit can display grips (drag arrows) for parts of your family so you can stretch them manually within a project. This is true for parameters that are defined as instance parameters. When you make a Reference Plane and assign a Strong Reference or other named option (see list below) Revit will display these grips if you've added a dimension assigned to an instance parameter. When you choose Not a Reference the grips will not be available. If the instance parameter bit is confusing, check my earlier blog post What Are Parameters and Why Should I Care.


The ListHere’s a list of the predefined names you can use. (No, you can’t add your own)

Not a Reference
Strong Reference
Weak Reference

Left
Center (Left/Right)
Right

Front
Center (Front/Back)
Back

Bottom
Center (Elevation)
Top

I sure hope this hasn’t made it more confusing than it really is??
Tuesday, August 02, 2005

Revit 8.1 release must be close...

Ran across the following pdf at the Autodesk Revit Building pages at Autodesk's web site.

Revit Building 8.1 Features

I guess they must be getting ready to release soon eh?

Thursday, July 28, 2005

Cinco de Mayo + 84

Some blatant self promotion...for a look at the recent formal announcement by Cyril Verley and CDV Systems of my affliation with his organization.

http://www.cdvsystems.com/press_20050727.asp

Sunday, July 24, 2005

Shared Parameters - Part 3

Creating a shared parameter

In a previous post I wrote about what shared parameters are and why we want to use them. We’ve discussed how to make the shared parameter file itself. Now we can deal with actually making a parameter.

I wrote about what and why earlier but you still need to know what you want a shared parameter for. For the sake of this exercise I’ll decide for you. We are going to create a parameter for Undercut, that feature we talked about before. If you don't remember, it is a parameter that not only changes the family panel geometry, it reports a value in our project's door schedule.

We need to open up your shared parameter file right?
Activate the Manage Ribbon tab and click the Shared Parameters button


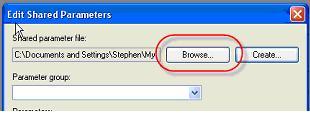
Click BROWSE and navigate to the file you created before! (Revit will offer whichever file was opened last by default)


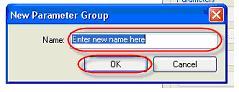
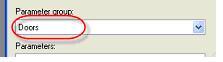
It makes sense to put parameters that all relate to something in common in the same place. Enter the Group portion of the interface. A group might be Doors, Windows, Casework, Sheets, Plumbing or for parameters that cross over, a group called Cross Category. In this case let’s make a Group called Doors. A shared parameter file must have at least one group before we can create any parameters.


Click New


For Name, type: Doors
Click OK


Now that we have a group we have a meaningful place to create and store a parameter.


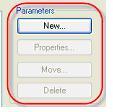
Click New
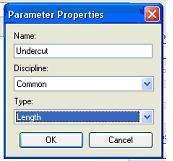
For Name type: Undercut


When you choose a name you have to really think about it for a bit. You need to be sure you are happy with the name because if you want to change it later you have to delete it and make a new one, start over completely. We can just rename a shared parameter easily whenever we want. It is definitely NOT something you want to do in a project half way through.

Why? Let’s say you add this parameter to fifteen door families and 10 projects. If you decide you like all upper case instead of title case and change it you’ll have to completely redo the work related to those parameters for all those doors and projects, assuming you want the change to be apparent in the projects.

Keep in mind that deleting a shared parameter from the shared parameter file (there is no live link to the shared parameter file) doesn't directly affect a family or project that already uses it. Only when you remove it from a family or project will it affect the existence of data.


Afterward, Click OK, then click OK a second time to close the shared parameter dialog.

Thursday, July 21, 2005

What? Nothing to Say!?!

Writing to say that I've nothing to say...well nothing that's fit to print...

In the works however is the follow up to the shared parameter discussion where we actually make one and then use it.

I've also got a baluster template and rough tutorial simmering in the slow cooker...

My ace reporter Freddy Latherdon checked in yesterday, dressed as an old Cajun woman, and claims he's got a big story that he's tracking. Can't wait to see what that means?!? He mumbled something, that I just couldn't make out, just before chasing after a shady looking man in a mauve suit that was lurking nearby.

In the meantime Freddy's cousin, Artie, stopped by asking if he could borrow a couple hundred bucks. Seems he's got this lead on a great investment. Naturally I gave him three...can't pass up a good investment, after all he said it was a sure thing!

Overanout!

Friday, July 08, 2005

RSS Feed...copycat syndrome strikes again

Yes...to copy my other Revit blog brethren I've attempted to add RSS feed capability! Even though I don't fully appreciate the importance of such a move and showing my true naivete!

Thursday, July 07, 2005

What are parameters and why should I care?

A recent conversation with a fellow Revit user suggested that my writing about shared parameters assumed too much perhaps...meaning that it assumes there is no confusion about the concept of parameters in general. So I thought I'd take a stab at explaining them...how well I do? You be the judge!

What are they? Why should I care?

They are the underlying information of all objects. They are how we communicate with Revit. They are the height of a wall, the width of a door, the thickness of a counter, the material of a floor, the elevation of a level and the scale of a view. Every piece of information you might wish to supply, change, schedule, calculate or study is a parameter.

We can group them in this manner...

Project Parameters: (Encountered in a project environment)
  • System (type or instance)
  • User Defined (type or instance)
Family Parameters: (Encountered in a project or family editor environment)
  • System (type or instance)
  • User Defined (type or instance)

Shared Parameters: (User defined and encountered in a project or family editor environment)

  • Project (type or instance)
  • Family (type or instance)

What’s this Type or Instance comment?

All parameters in Revit apply to either the kind or “type” of object you are working with or the individual “instance” of the object. A wall style whose “type” is 8” Masonry has “type” parameters that affect every individual “instance” of the wall while its “instance” parameters only affect a single wall “instance”. The thickness of the wall is a “type” parameter. Every “instance” of the wall will be the same thickness. The height of the wall is an “instance” parameter so each wall can have a different height if necessary.

To explain this stuff I feel you have to break the rule of not including the word you are defining in the definition. So to make up for it…I’ve used the words repeatedly and in a sentence at the same time!!

So what can I expect from each of these parameters?

System parameters: For either families or projects are those that Revit defines for us. We can’t change or alter the character of them except to provide different values for them. Every object in Revit has some system parameters.

Some examples: (parameter in quotes)
  • Wall “Top and bottom constraint“
  • Wall “Location Line”
  • Floor Object Layer “Thickness”
  • Casework “manufacturer”
  • Window “width”
  • Project “Name”
  • Project “Client Name”
  • View “View Scale”
User Defined parameters: Let us decide what information a family or project will have in addition to the system parameters.

Some examples: (parameter in quotes)
  • Room “Occupancy Classification”
  • Project “Issued Date”
  • Project “Issued Description”
  • Door “undercut”
  • Door “jamb detail type”
  • Window “Glazing Area”
It is important to appreciate that User Defined parameters, created in a project can appear in a schedule but not tags. Those created in a family, cannot be used in schedules or tags. This is where the next parameter type comes in…

Shared Parameters: In a way these combine the nature of system and user defined parameters. Shared parameters allow us to tell Revit we are talking about the same information whether it originates in a family or a project. They can be used to create a parameter in either a family or project to allow the information to be displayed in a schedule and/or tags.

When you create a parameter from a Shared Parameter, there is no link to the file they come from. Instead the shared parameter file permits you to tell Revit that you are referring to the same piece of information when you use it to create parameters. When Revit encounters a parameter in a family within a project that also uses the parameter it automatically knows they are the same. This allows you to schedule and tag objects.

Hopefully this helps!!

Saturday, June 18, 2005

Making a Shared Parameter File

Creating a Shared Parameter file is only few steps. First you click FILE > SHARED PARAMETERS


Next you have to click CREATE


Last you need to decide what folder it should be in and name the file. DONE!

Wednesday, June 08, 2005

Revit Structure is Released

June 7th marks the day that Revit gets a "stronger" brother. Revit Structure is the new companion product for Revit Building. Check out www.autodesk.com for more information and the Revit Community Forums at www.AUGI.com to see the latest.

Thursday, June 02, 2005

Sharing Parameters - An Overview

Ready? Here we go!

The big ultimatum!

If you use them everyone in your firm must use the same shared parameter file. Big office, little office, one man firm no matter. Makes sense right? No?...maybe we need to explain them a little more?

The Explanation!

Shared Parameters are how we can talk about a piece of information (use it in a project and a family) and tell Revit that when we use this parameter we really are talking about the same thing. Time for an example you say? Funny I was just thinking the same thing...

The Example!

A door often has a feature we affectionately call "Undercut", the portion of the door at the very bottom that hopefully doesn't catch on that throw rug in the hall. Let's say you like to schedule this piece of information and you want to also make the 3D geometry of the door family show a real undercut.

It's easy to make the geometry change right? Add a reference plane, a dimension...lock this or that and add a label...good to go. But what happens when you put it in a project? You can change the Undercut parameter in the family and see it change, no worries right? But now try to schedule it...no Undercut parameter in the field list. Why? The parameter is part of the family and the project doesn't know a thing about it.

Enter Shared Parameters to the rescue!!

Now if we back up and use a shared parameter in the door family when we apply a label to the dimension that constrains the undercut...guess what? We'll find that we now have a parameter to schedule when we load the door into the project. Why? Revit will bring a shared parameter along for the ride and allow it to be used in a project.

Umm...What if?

Now what about a door detail? If we want to schedule the relevant detail number for a door's jamb detail, that's something we aren't going to need in a family to constrain and flex geometry. It's just information right?

Time for...

Steve's Family Rule #(well, honestly, a little undecided about the number)
Shared parameters belong in a family only when it must appear in schedules AND constrain or flex the geometry in the family.

Family parameters are for constraints and flexing your geometry.

Checking for anyone sleeping!!

To add this Door Jamb Detail parameter to my door, I just add it to the door family and then load it into a project...good right? NOOOOOooooooo!!! You haven't been listening!!

Back to the Explaining!!

Information only parameters need to be added to the project and assigned to the door category as project parameters. This particular example doesn't even need to be a Shared Parameter because it doesn't need to be shared between the family and the project. It is only relevant in the project. Unlike the Undercut parameter which has a role in both the family geometry and the project schedule data. Think of the width or height parameters that are built into families as a system or native shared parameter that the "factory" builds for us. Shared parameters are the user created version of these.

Clear as mud?

Next should I outline how to actually do it?

The big Oh by the Way!!

When I proclaim you have to use the same file, it's very true. But you can have many files as long as they don't declare the same parameters. So you could have a separate file for doors and windows. But hey, why do that? They gave you the ability to group them in the same file already. Just being clear, you can use more than one file, just not for the same parameter. Oh...why? Because each parameter actually gets some code applied to it so it is unique in the world as far as Revit is concerned. In fact, don't edit the file outside of Revit...the file tells you not to! How do I know? Sorry I can't admit that I opened one and saw the warning...oops I just did?

The big Oops!!

If you mess up and lose the file, panic not! There is an option to export shared parameters from a project to recover. Better read the help docs for an explanation on this. I'm running out of ink!!

Friday, May 06, 2005

Cinco de Mayo + 1

This day represents a major turning point in my life. May 6th, 2005. It is the last day of my employee life and the beginning of my self employed life. Not since I left the roadie life and the Stevie Ray Vaughn tour has such a decision been so life changing.

This was my last day as a member of Wimberly Allison Tong & Goo (WATG). It took a great deal of courage on my part both to leave a great firm that gave me a lot of opportunities to grow and to walk away from everything that means.

I wish I could give some great "dirt"...like they were asking me to cross dress or use ADT instead of Revit but truth be told, they were great!! My direct boss Jim Balding was a great boss and we had fun working together...or at least I did! Our boss Larry Rocha was also a great boss to have.

Besides those in the Newport Beach office, I miss Danny Polkinhorn in Honolulu, a great programmer and all around nice guy, and the teams I worked with there as well as the folks in the London office. I've got to mention Scott Brown naturally, his recommendation gave me additional credibility when WATG asked to talk with me 14 months ago. He's a great Revit guru and a true early adopter like Jim and WATG. It was too bad when he ran off to the Orlando office because we didn't get to interact as much after that. I've said it already, but it's a great firm filled with talented nice people so it is easy to miss them for sure. I wish them and WATG the best and I'm looking forward to seeing what they do with Revit in the coming years!

So now I embark on this path...wondering where it leads? Will it be fun? Will I have time or money to do the things I want to do? Will my family put up with me? All questions I'll have to answer later...but so far so good!! Wearing my bunny slippers to work on days when I'm not traveling is pretty cool!

Oh...so what am I doing? Why, Revit consulting of course! I'm working as a consultant with Cyril Verley of CDV Systems, Inc. Have notebook computer and Revit, will travel!